3D on iPad: two alternatives

To better support every iPad user, our Beta 3D now has two alternative ways to display 3D on the iPad:

  1. 3D views in the CloudAhoy app
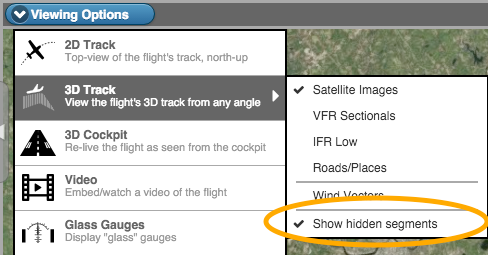
    You can select 3D Track and 3D Cockpit from Viewing Options, as we described in a previous post, fully integrated with the rest of CloudAhoy.
  2. [new in Beta 3D] CloudAhoy invokes the Google Earth app to display 3D
    This option exists in our non-beta software, and now we added it to the Beta 3D as well, based on feedback.

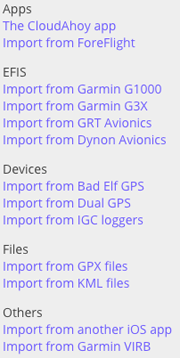
To view your flight in the Google Earth app,  tap the Google Earth icon on the top bar of CloudAhoy, and select either 3D Track or 3D Cockpit. The Google Earth app will be invoked and display the flight.GE-dbox


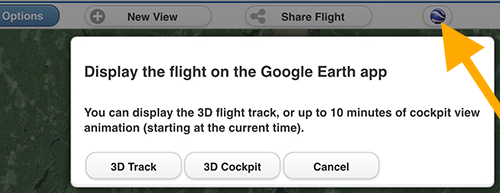
Q: When would I use the built-in 3D (Cesium), and when would I use Google Earth?

A: The preferred option is to use the built-in 3D (Cesium), our full-featured integrated 3D. Exceptions:

  1. Use Google Earth if you have an older iPad. On older/slow iPads Cesium may not run well or may not work at all, and your only option would be to use Google Earth.
  2. Use Google Earth if you would like to see 3D buildings and trees. Google Earth displays them, Cesium does not.
  3. Some users prefer the rendering of the Google Earth app, some like Cesium’s better.


Q: What is the disadvantage of using Google Earth?

A: Google Earth is a separate application, and is not fully integrated with CloudAhoy – you can see your 3D Track with color coded segments, and cockpit view animation, but none of the other features.

steepTurnTr steepTurnCV
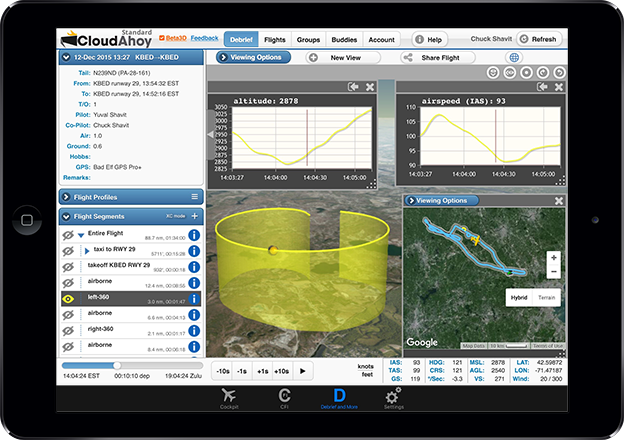
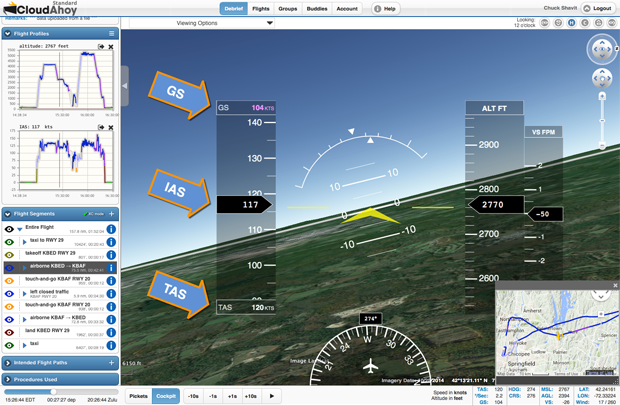
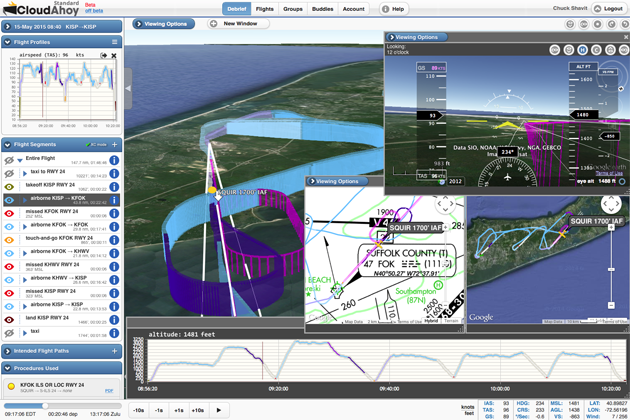
3D-track on Google Earth
Note the auto color coding of
the PPL maneuvers
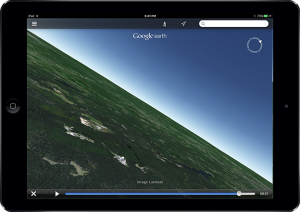
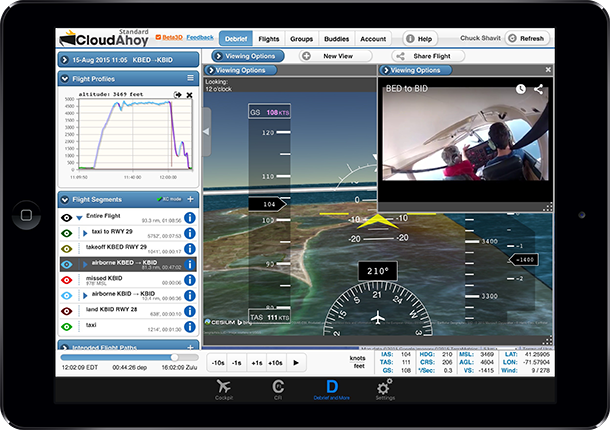
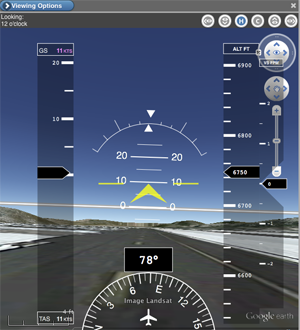
3D-cockpit on Google Earth
Executing 360 turn, the yellow
segment in the 3D-track on the left


Video: 3D-cockpit on the Google Earth app
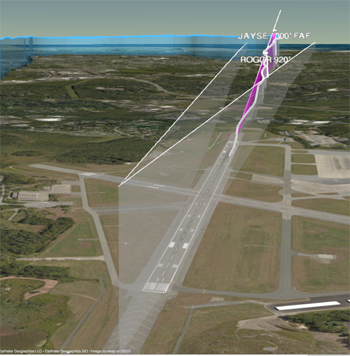
Landing KACK RWY 24

Declutter and Context – a new aid

It is often useful to focus on one maneuver of a flight, and see this maneuver in context.  We’ve just added a new feature to make it easy.

Here is a typical example – a single loop from multiple traffic patterns (this screenshot is taken from our new tutorial Debriefing Traffic Patterns):

declutter

The screenshot (taken on a Mac) shows cluttered traffic pattern loops in the small view, and a zoom on one specific loop in the main view. To create this

To Declutter:
 □ On the Flights Segments (left pane) click the “eye” next to Entire Flight, then click the “eye” next to the segment(s) you want to focus on.

To add a “context” view
 □ Click New View to create a small  view.

 □ Click Viewing Options, select “3D Track” and “show hidden segments”.


This technique allows you to view selected parts of the flight in one view, while displaying the entire flight in another to see things in context.


Another example: focus on a student’s left 360 maneuver. The screenshot below (taken on an iPad) shows both the entire flight, and a zoom on the decluttered maneuver. By moving the aircraft symbol , a CFI can highlight the issues in this maneuver.
360-on-ipad


3D Cesium-based – on the iPad too! *Public Beta*

We are excited to start the public beta of our new 3D Views, based on Cesium.

YuvBID

3D-cockpit on iPad

Why a new 3D? What is Cesium?

The initial trigger for the change was that our existing 3D is based on the Google Earth plugin, which is being phased out by Google (for the curious, read this ). The Google Earth plugin is already unsupported in Chrome, and will be discontinued by Google this December.  thanksBetaGuys

We started to look for an alternative, evaluated Cesium we realized that it has many advantages. We have been working on the integration for a few months now, with collaboration from the Cesium people – see our demo page on their website. It’s a great team to work with.


What are the benefits?
The important advantages of Cesium over the Google Earth Plugin:

  • Runs everywhere:cesium-example1
    – iPad – great news for many of you!
    – Any computer, any browser:
    —– Windows, Mac and Android
    —– Chrome, IE, Firefox, Safari 
  • No plugin! No need to install anything, and the browser will not ask you to approve its use.


Issues?
The main caveat: it requires a relatively modern hardware. It will run nicely on a 2-year-old PC or Mac and on an iPad Air 2. If you have an old computer or an old iPad – regrettably, the new 3D will probably not run so well; we continue working with Cesium on performance improvements.

Another issue:  currently there are no 3D buildings.

Other than that – it works great!
The new 3D works great for us and for our pre-beta testers.
Bear in mind that it’s a new technology, though, not as mature as the Google Earth plugin.


How to join the beta?
To start using the new 3D, click the ꩄbeta3D checkbox on the top-left on the screen.

If it does not work well for you, you can get off the beta and continue using 3D with the Google Earth plugin, or stay on the beta and use the 2D only.  And – IMPORTANT – let us know, please!

We are eagerly awaiting your feedback!
Tell us how it works for you – the good, the bad, and the odd.
Use email, or you can use the feedback link on the top-left of the screen. We always reply.

New and improved flight sharing

Sharing a flight via email

Sharing a flight via email

For those of you who share their flights with others – we have a new and improved way to share: quicker, and personalized. It has a thumbnail image of the shared flight – a popular request.

Sending flight share in an email
The other day I flew with non-pilot friends to Nantucket. It was a perfect flying day, and after we left Boston’s class bravo I let my friend in the right seat drive most of the way. He was thrilled.

Back home, I sent him an email with the flight’s share. The new share’s email feature includes a thumbnail of the flight in the email message, like the example on the right. My friend could click the thumbnail or the link in the email and relive the flight.

Receiving a link
We also made it easier to view a flight share, even for non-pilots; this is what my friend saw when he clicked the thumbnail in his email. In this share I was using our new Cesium-based 3D rendering, which, at the time of writing this post, is a sneak preview of the tech to come.

How to share a flight?
When you debrief a flight, note the new share-flight-button button on top.

share-emailexample3

Sharing a flight on Facebook

Clicking the button, you now can:

  • Create a link to the flight
  • Post the flight on Facebook (example on the right) and Twitter.
  • Share with your buddies/groups
  • Embed the flight in your own web page,
  • Send an email with the flight link and a thumbnail to anyone.

Details here. BTW, you can also share a flight  from the Flights tab.


AHRS data from Stratus 2 or 2S, and from EFIS

AHRS_taildraggerWe collaborated with ForeFlight, and as of today we use the measured AHRS data (pitch & roll) as captured by Stratus 2 and 2S.

How do I import my Stratus AHRS data into CloudAhoy?
You need to download and import the KML file from your ForeFlight account on the web. See 2. Import from ForeFlight on the Web.
Note: if you import your ForeFlight flight track directly from ForeFlight’s iPad app, AHRS data will not be included.

How does it affect my debrief?
When you display cockpit view, and when you display glass gauges, the measured pitch & roll are displayed.
The screenshot on the right shows cockpit view of a taxiing taildragger, with 10° pitch.

What if I don’t have an AHRS?
Then we display the computed pitch and roll, like we always did. It’s very close to the measured pitch & roll in most cases.

I imported data from an EFIS (like Garmin G1000). Which pitch & roll is displayed?
CloudAhoy will use the measured AHRS data from the EFIS. We support CSV file import from the following EFIS; click each link for instructions.
Garmin G1000,
Garmin G3X,
GRT Avionics,
Dynon Avionics.

Can I use the computed pitch & roll even if my flight data has AHRS data?
Yes: Account tab > Use AHRS Data if Available > Off.


Import flight data: four new formats

FlightImportWe added four new sources for flight data, which you can import into CloudAhoy using the Flight Import button on the Flights tab:imports
CSV from GRT Aviation
CSV from Dynon Avionics,
KML file format
IGC file format

This extends the list of supported devices and file formats (on the right).

While many pilots use our free CloudAhoy apps on iOS and Android to log data, we see a trend towards importing from other sources. For example, our users log data with ForeFlight+Stratus and import it to CloudAhoy, or import rich avionics data from G1000’s data card.

Importing data, as opposed to using our apps for logging, may have benefits. Please refer to our online help.

Universal Windows – public beta has started

We are excited to start the public beta testing of our new Universal Windows.

To the users who tested the pre-beta versions – a big thank you!

UW9

With Universal Windows you can open any number of windows, and display any view in each – 2D or 3D track, cockpit view, video, aviation charts, wind, etc. You can now add the glass gauges to any window, and in any size.

To use the beta software, see this. It’s easy to join the beta program, and if something doesn’t work well it’s easy to revert back to the released software.

Feedback of any kind will be highly appreciated! As usual, send feedback dev@CloudAhoy.com.

Current 3D beta limitations: as of today, the beta software supports 3D only on
– Windows: Firefox browsers
– Mac: Safari and Firefox.
The good news is that we are now in the process of developing full 3D capabilities for every computer/browser configuration. Yes, including the iPad! Coming soon – stay tuned.

Bad Elf Pro+: display barometric pressure profile

BaroPressure
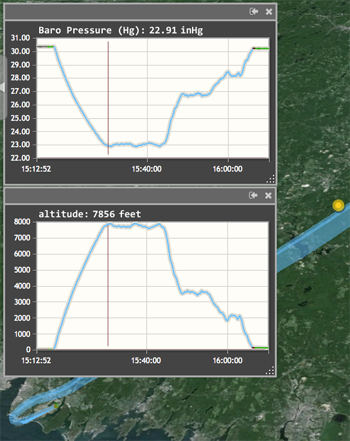
One of the benefits of using Bad Elf Pro+ is that it logs the barometric pressure – useful information especially if your cockpit is unpressurized.

If you log your flight with Bad Elf Pro+ and import the data to CloudAhoy, you can now include the barometric pressure in your flight debriefs.

The CloudAhoy screenshot on the right shows the barometric pressure in inches of mercury. It can also be displayed in millibars.

To display the barometric pressure,

  1. Log the flight with Bad Elf Pro+. It’s a convenient alternative to logging with your iOS or Android app.
  2. After landing, download the flight’s GPX file from the Bad Elf Pro+.
  3. Import the GPX file to CloudAhoy.
  4. Select “Barometric Pressure” from the profile menu; you can select the data in inHg or in millibars.

Visiting Sun ‘n Fun 2015!

SnFHope to see you at Sun ‘n Fun. I am giving three forum talks about CloudAhoy. Please come –

Wednesday 12:00
Practical techniques & overview – room 5

Friday 12:00
Debriefing for instrument Pilots – room 6

Saturday 12:00
Debriefing for safety and self-learning – room 8

To meet up, email chuck@CloudAhoy.com, or call 781-269-1138.

We do not have a booth this year, but I’ll be around and hope to meet many of you.

See you,
Chuck

Added IAS to CloudAhoy’s Glass Gauges

The airspeed tape of our glass cockpit now include IAS and GS, in addition to TAS.

Less than an hour after we published our previous blog post about the glass cockpit gauges, we started receiving emails requesting a display of the Indicated Airspeed (IAS) in addition to the True Airspeed (TAS). It’s available now. In the example below, IAS is 117 knots, ground speed (GS) is 104 knots and TAS is 120 knots.

If your flight is imported from Garmin G1000 or Garmin G3X, the IAS number is the actual indicated airspeed that was displayed in flight. If you are logging the flight in a different way, we display a computed IAS.

glass,IAS


Note: the glass cockpit screenshot above was taken on a Macintosh. See this for its look on Windows and iPad.