Britt’s Rusty Pilot Blog #2 – Bay Tour


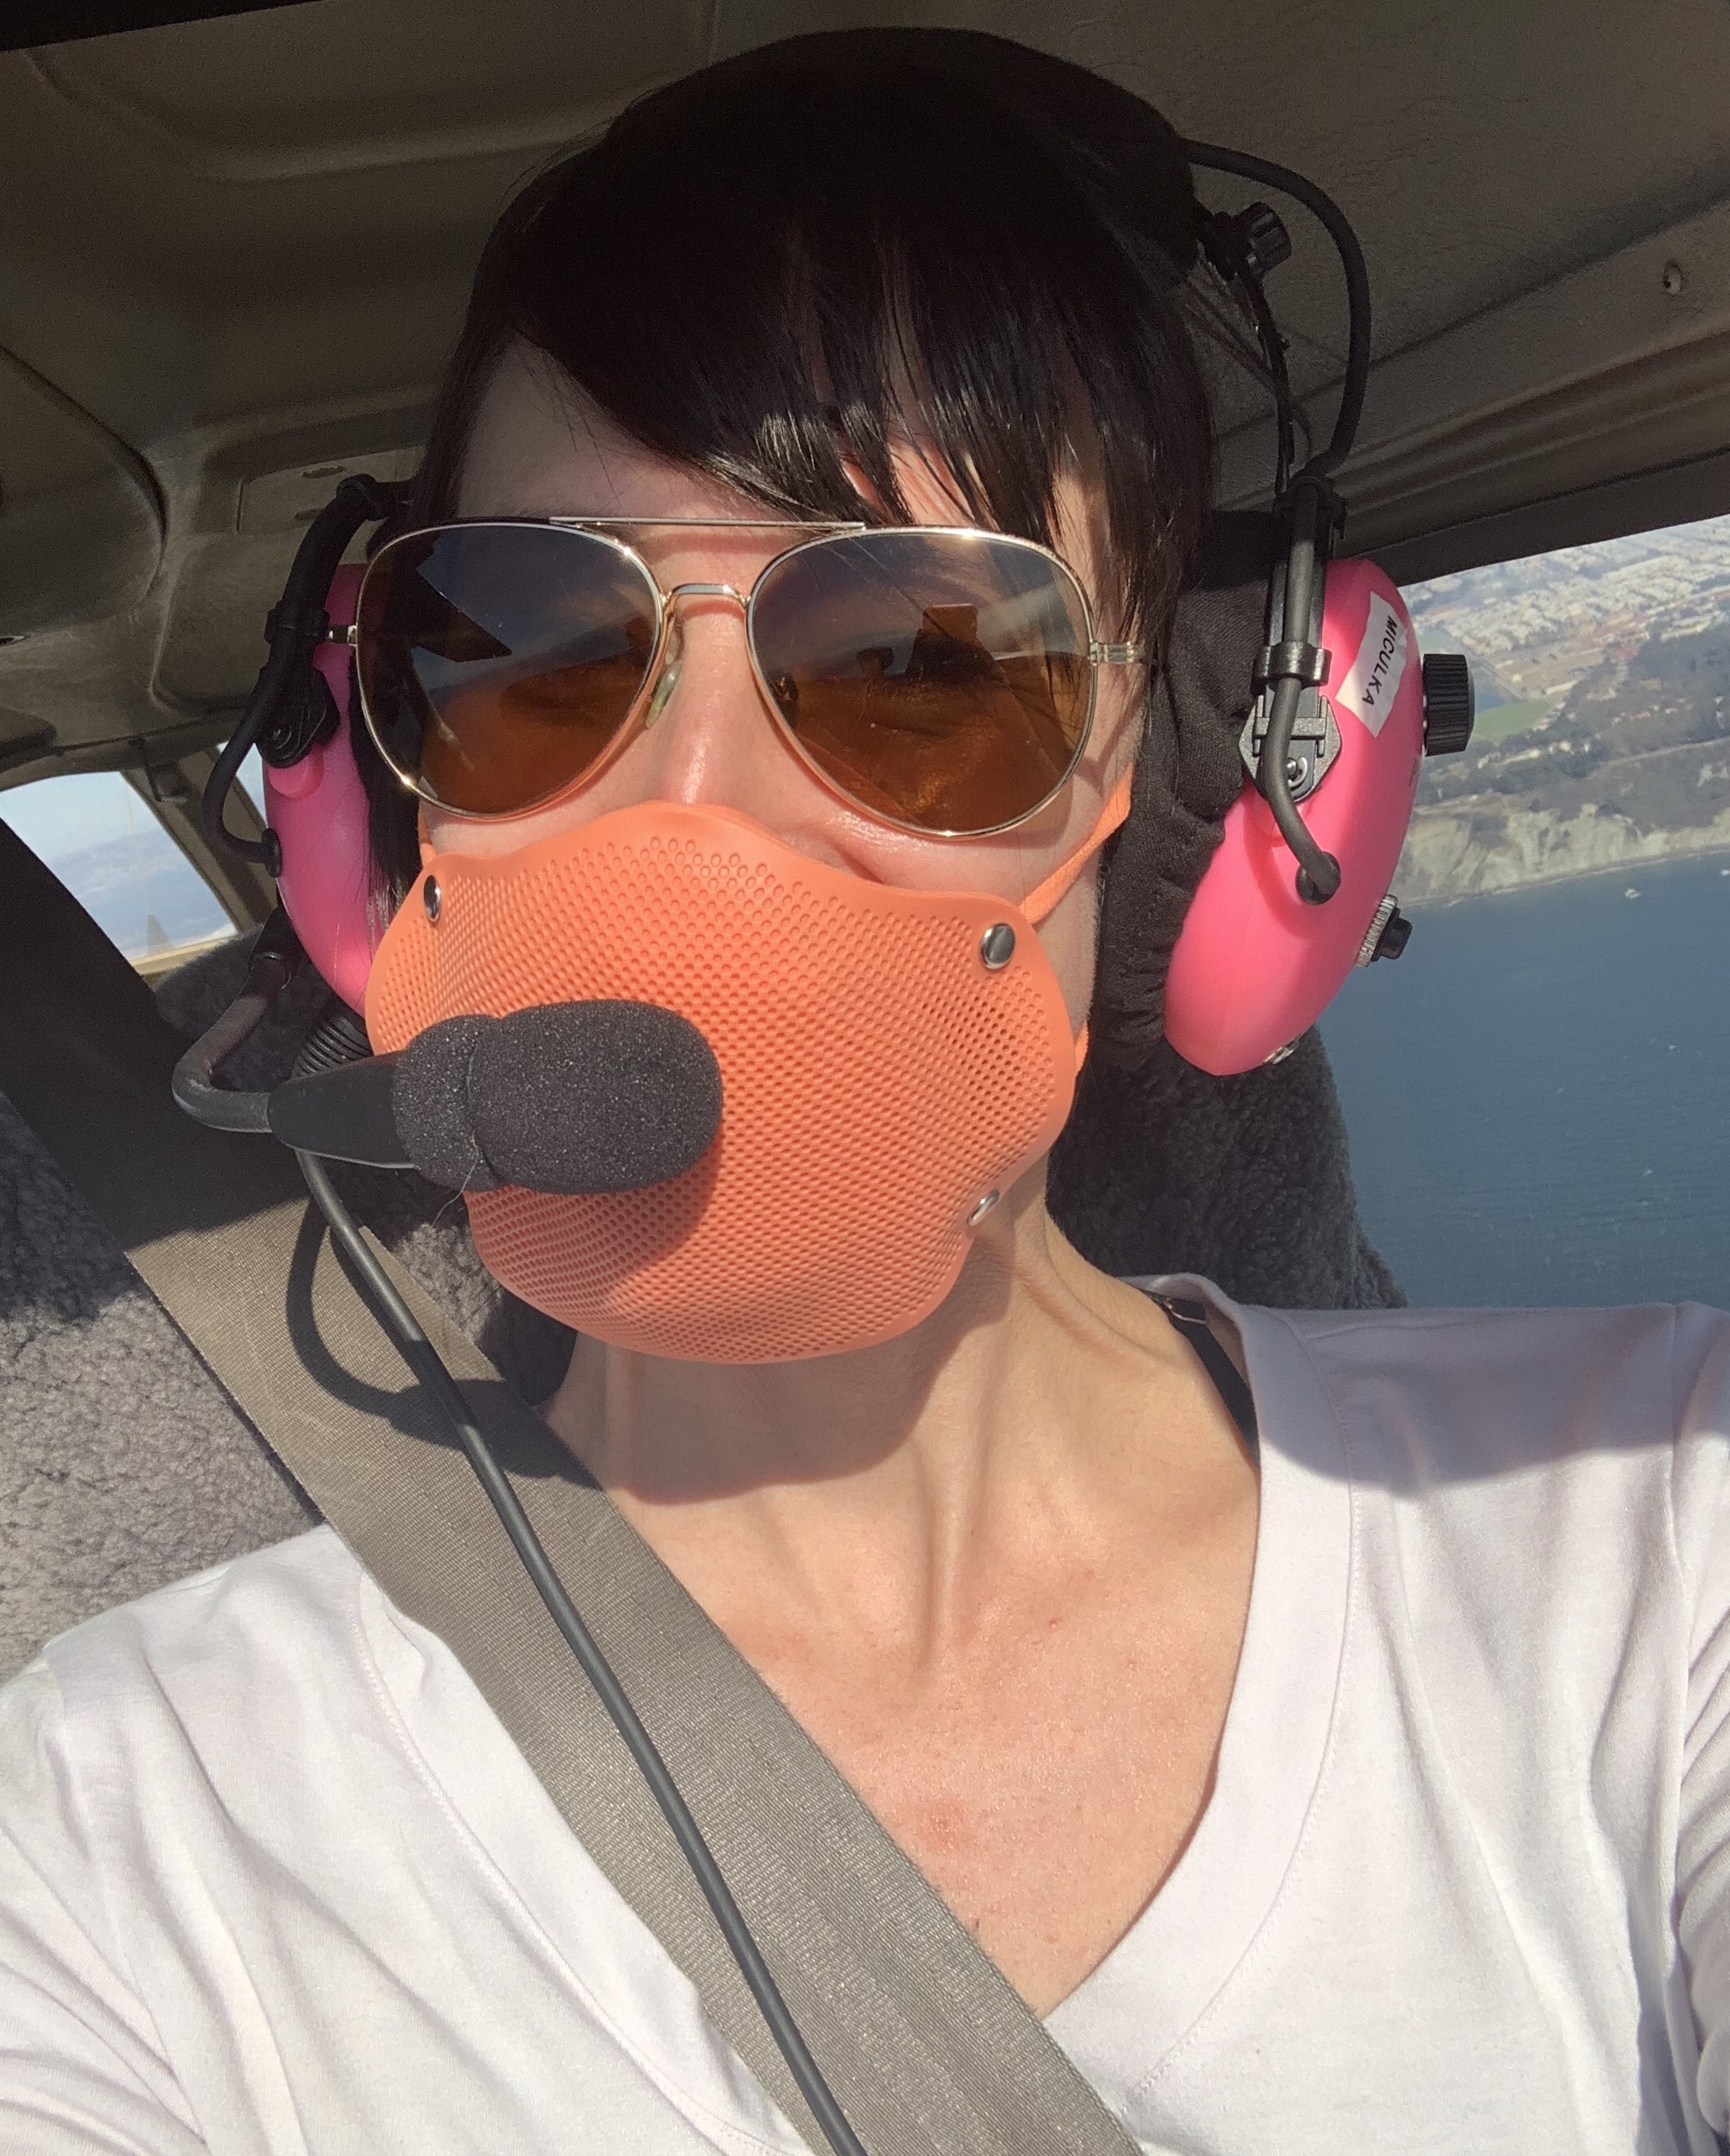
Truth be told, I’m a bit intimidated to fly again and don’t want to rush my flight review. I don’t want “just” the endorsement that shows I’m legal to fly. I want to feel safe, ready, and confident in my abilities. So, my flight instructor at San Carlos Flight Center, Mari, and I decided that we’d start off with a fun flight first. Something that would allow me to get back at the controls right away without too much ground discussion, maneuver prep, or stress. We made my first flight back a San Francisco Bay Tour. It was perfect. A clear beautiful day (very welcomed after weeks of smokey haze and strange skies). It was a great orientation to the local airport procedures, airspace, the plane’s radios and avionics, and to knock the rust off my ATC communications. It was a 1.2 hour flight and a nice way to get started and be challenged.

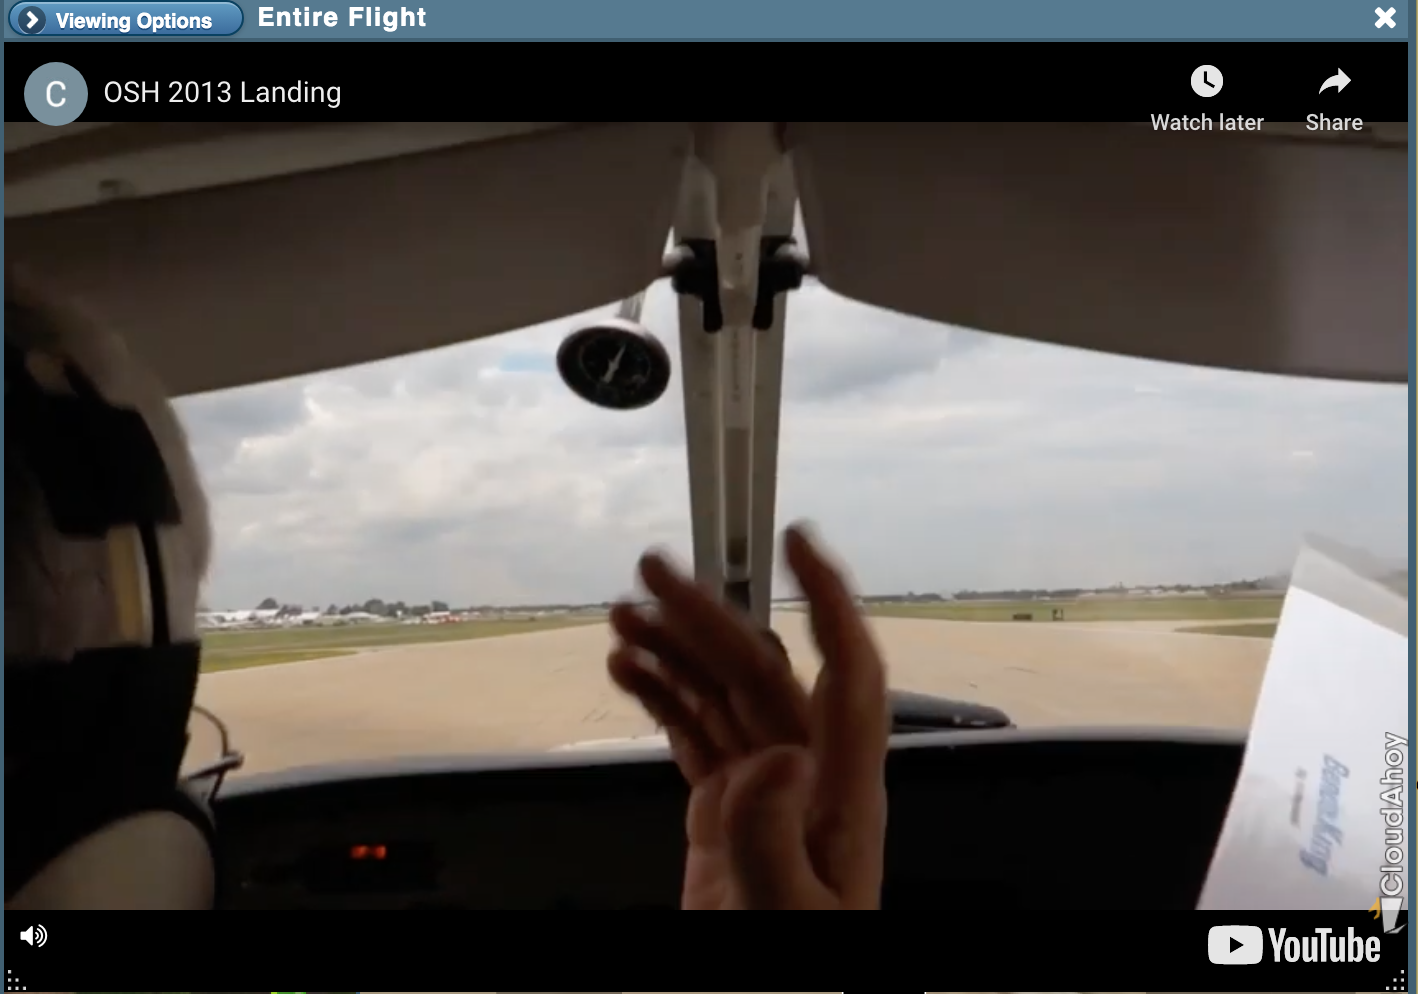
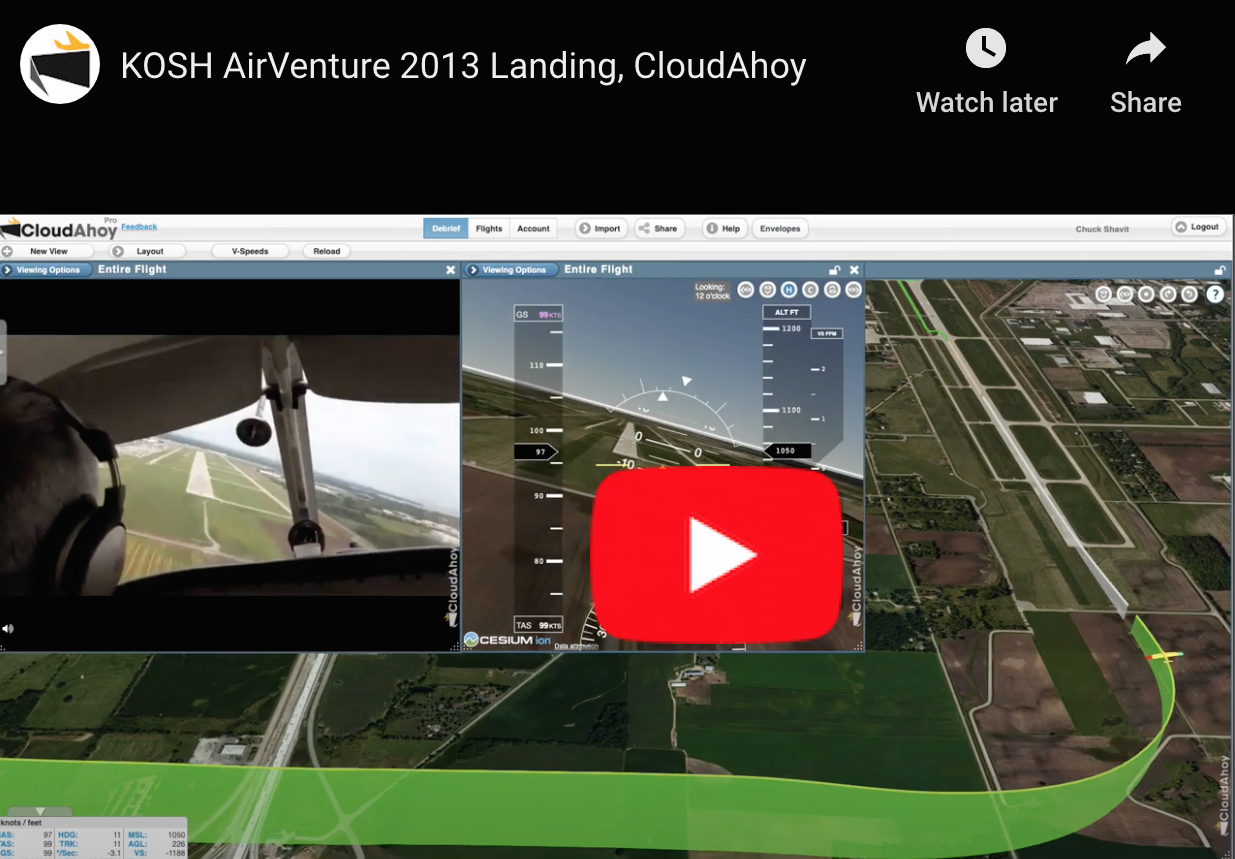
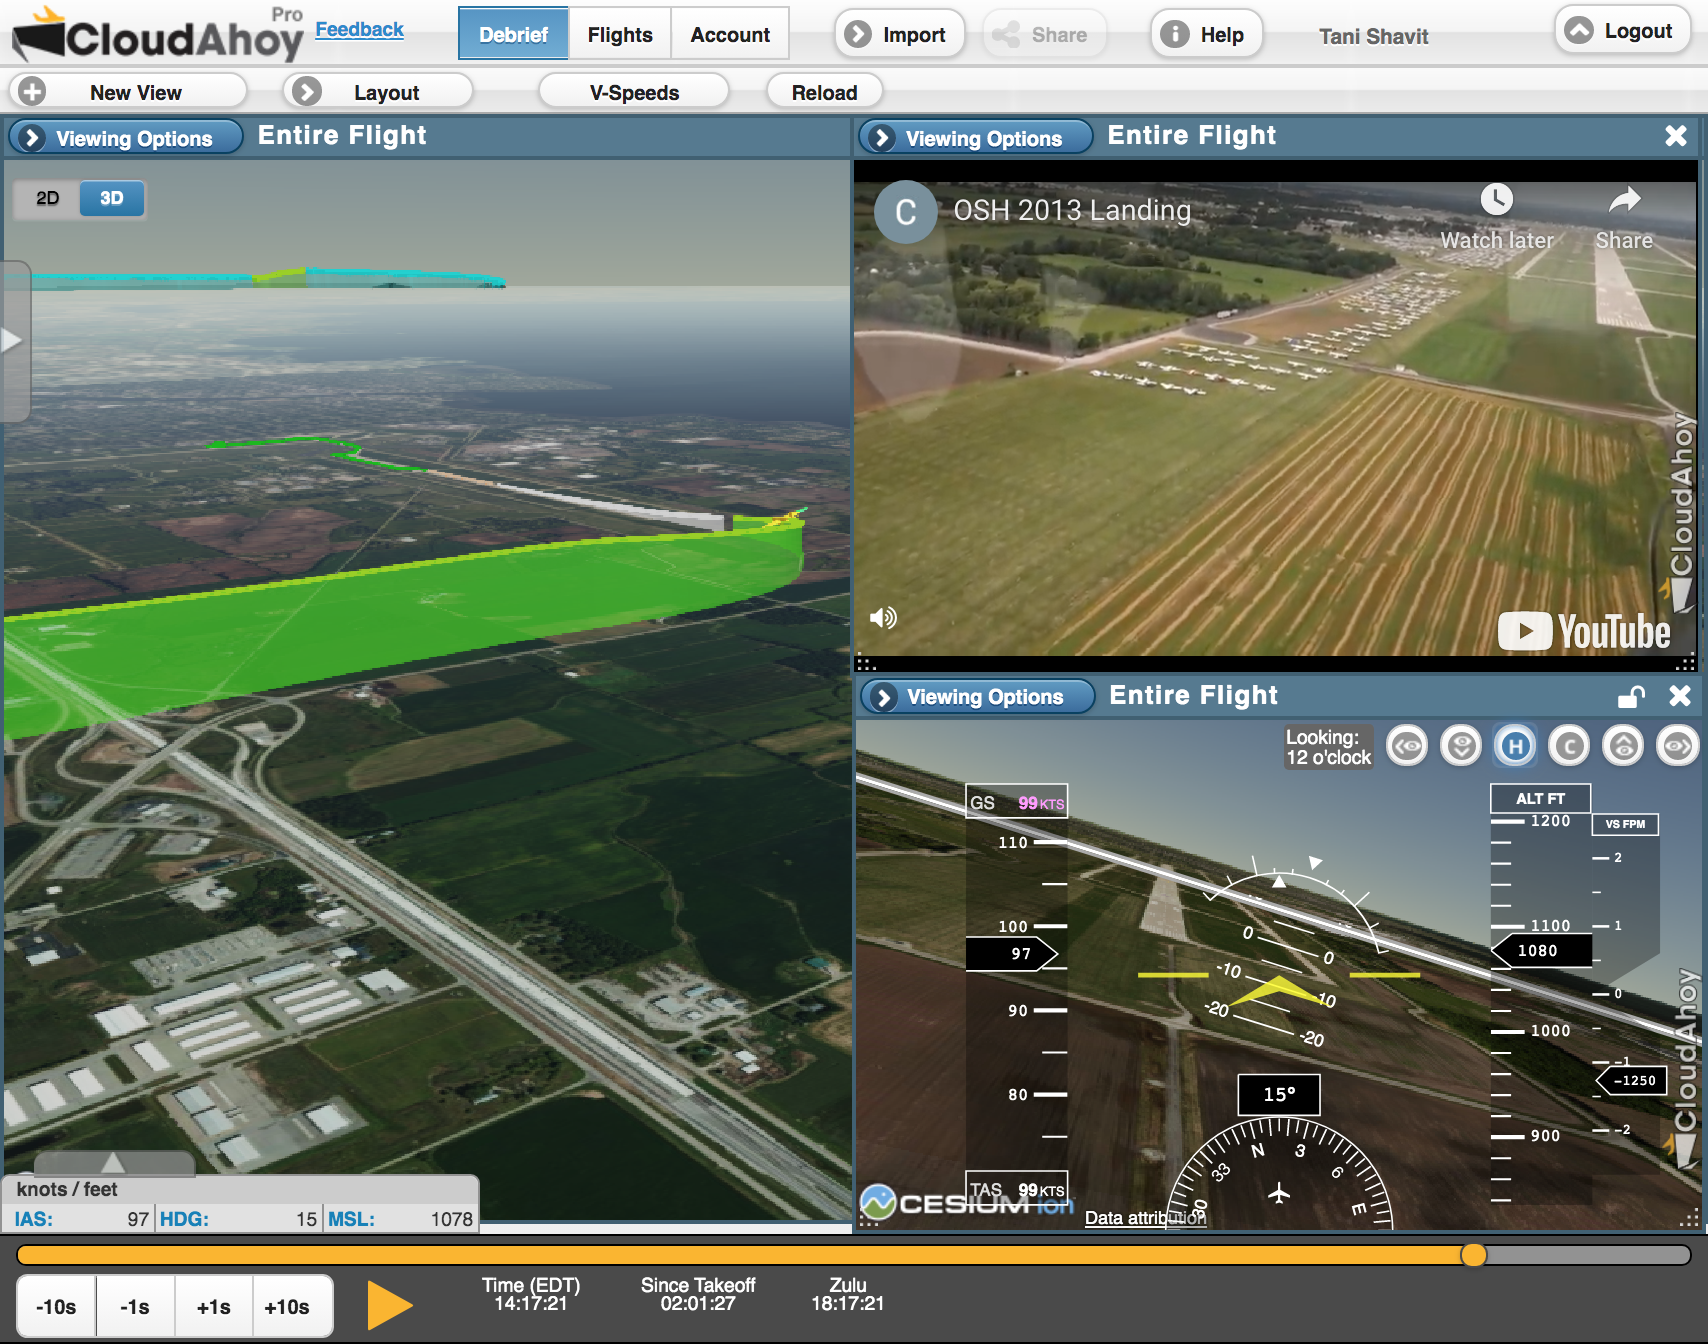
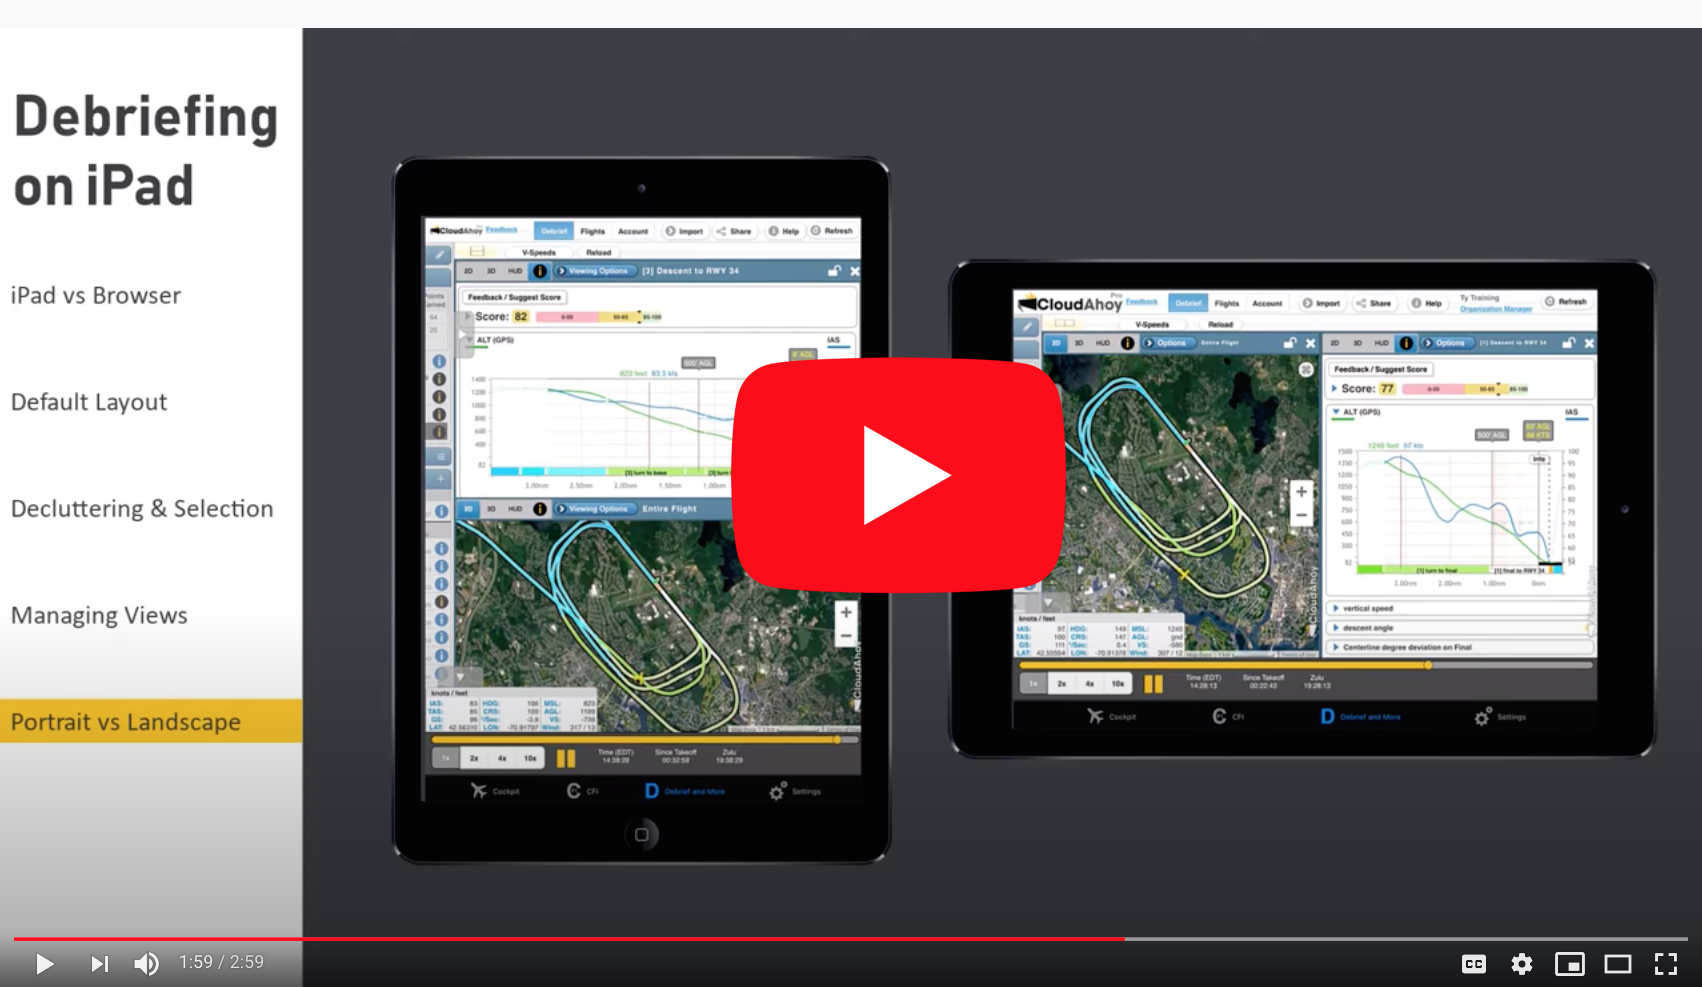
*I’ve also made a video of my debrief, you can check it out here!*

Let’s debrief my Bay Tour!

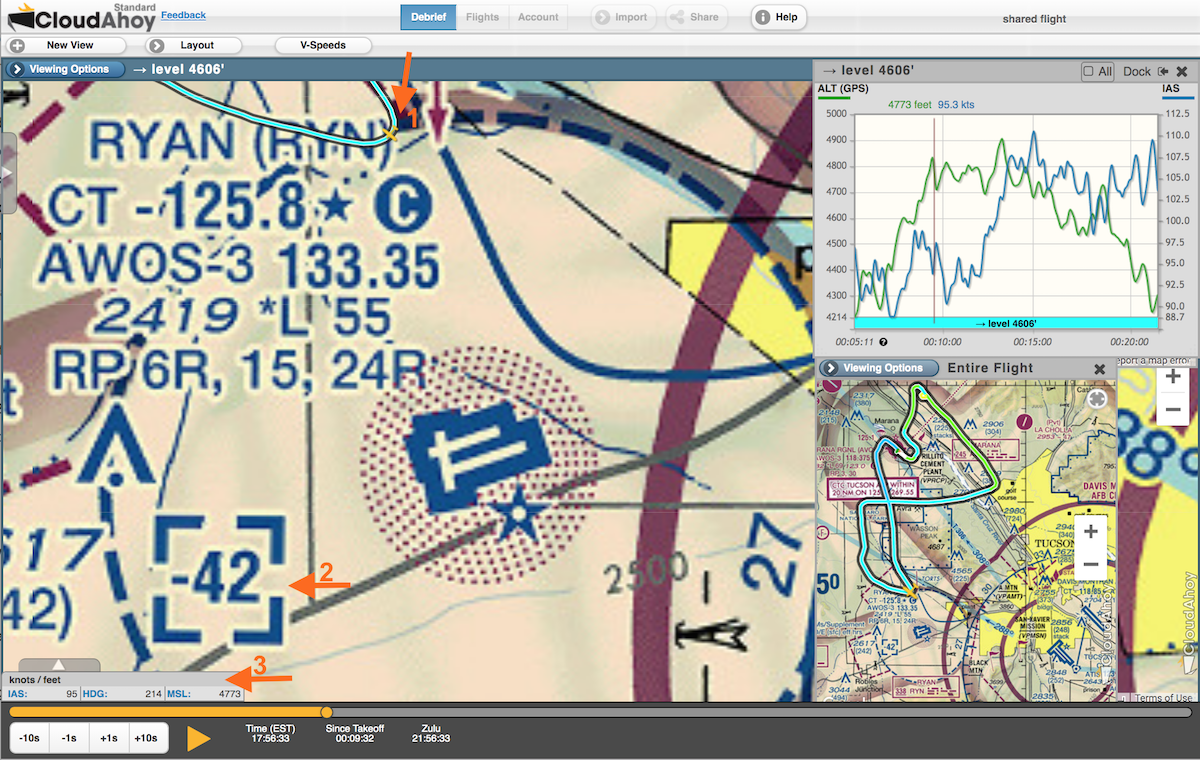
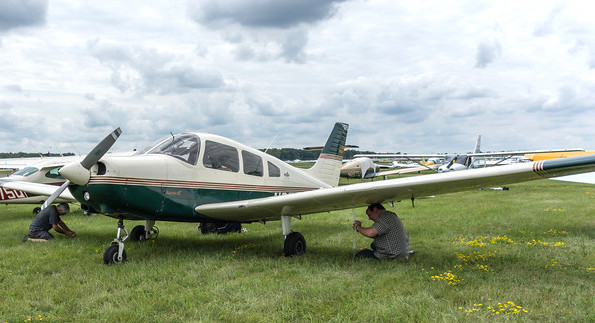
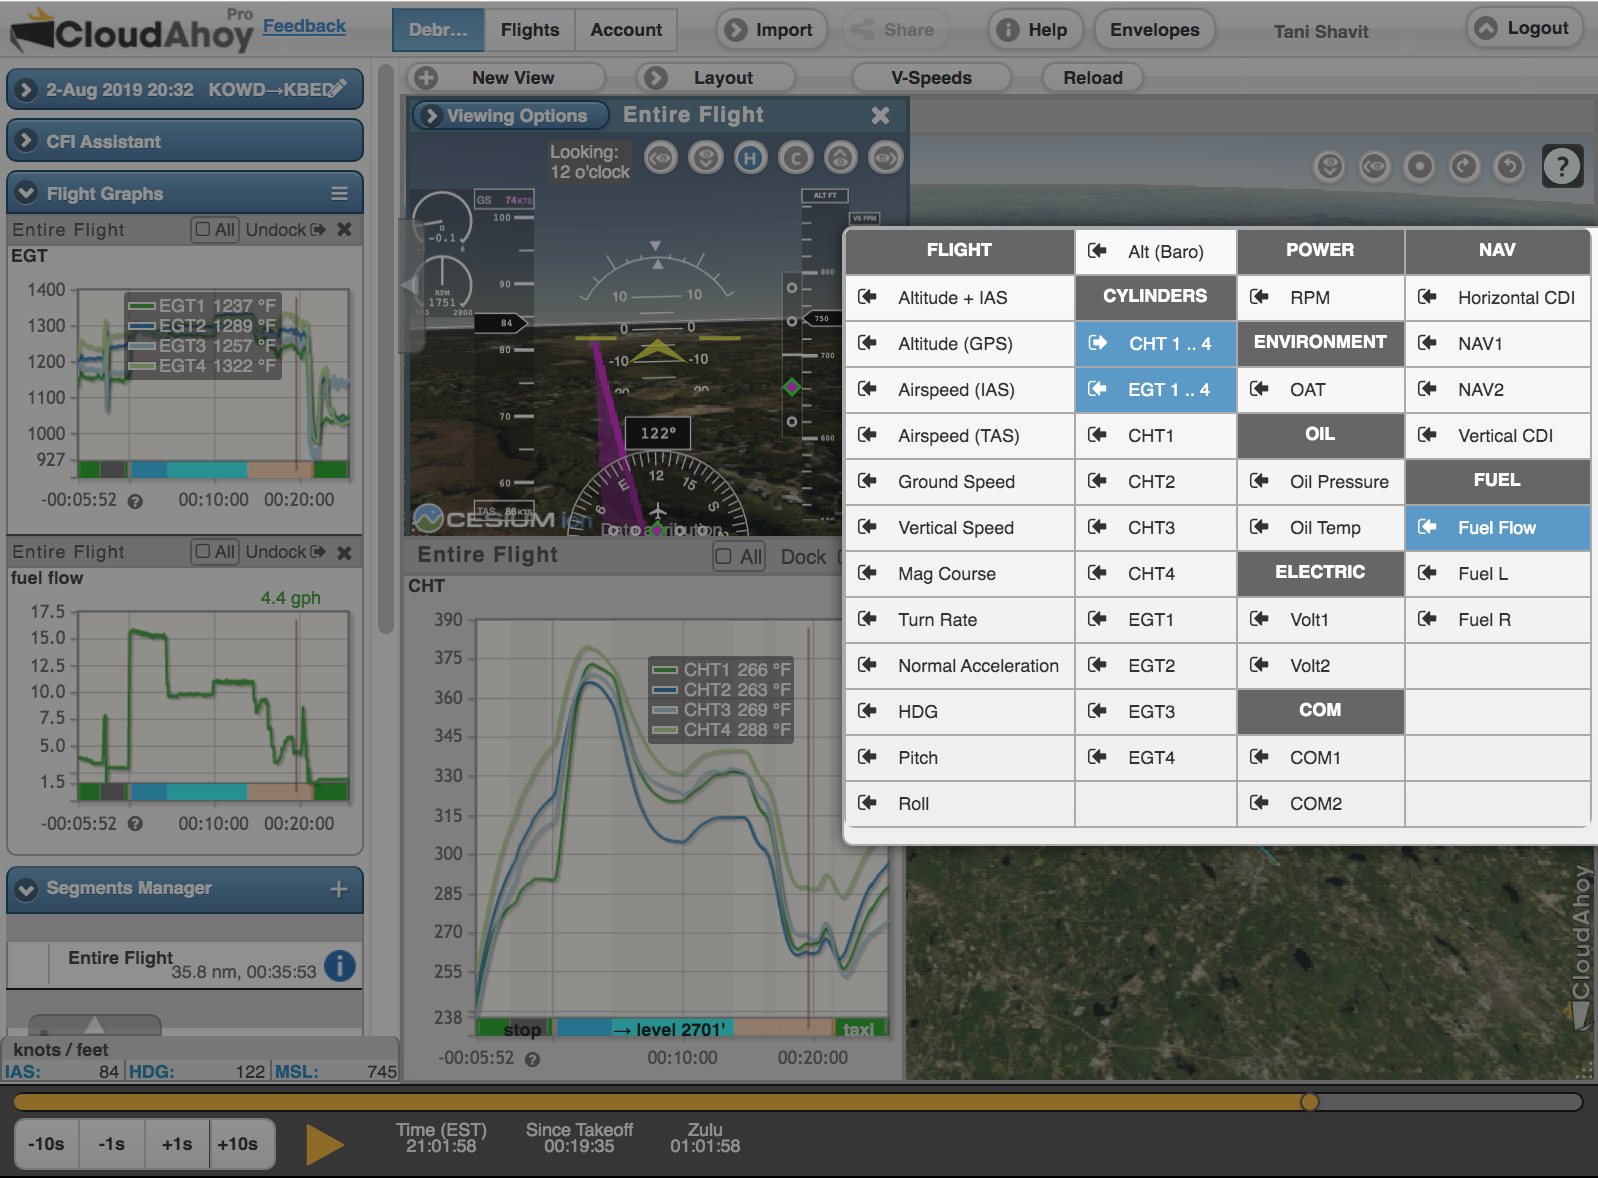
I flew a steam gauge C-172 and recorded my flight from the CloudAhoy app on my iPhone. Debriefing my flight with CloudAhoy was very helpful to review all the local landmarks my instructor had pointed out. For noise abatement after takeoff from San Carlos airport, we were to follow the “Oracle Departure”. This meant at the diamond shaped waterway, I was to turn right and follow the slough, being sure not to fly over any of the homes on either side. Check out how I did… pretty good and kept the neighbors happy.

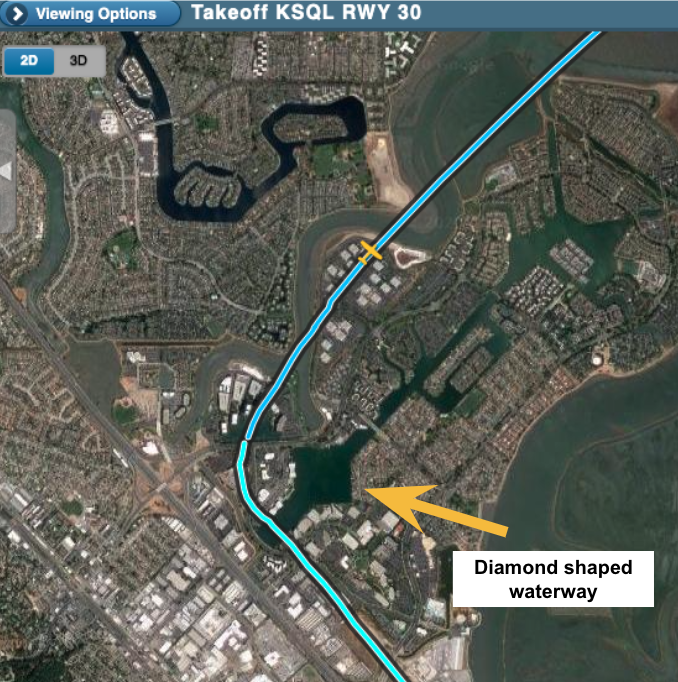
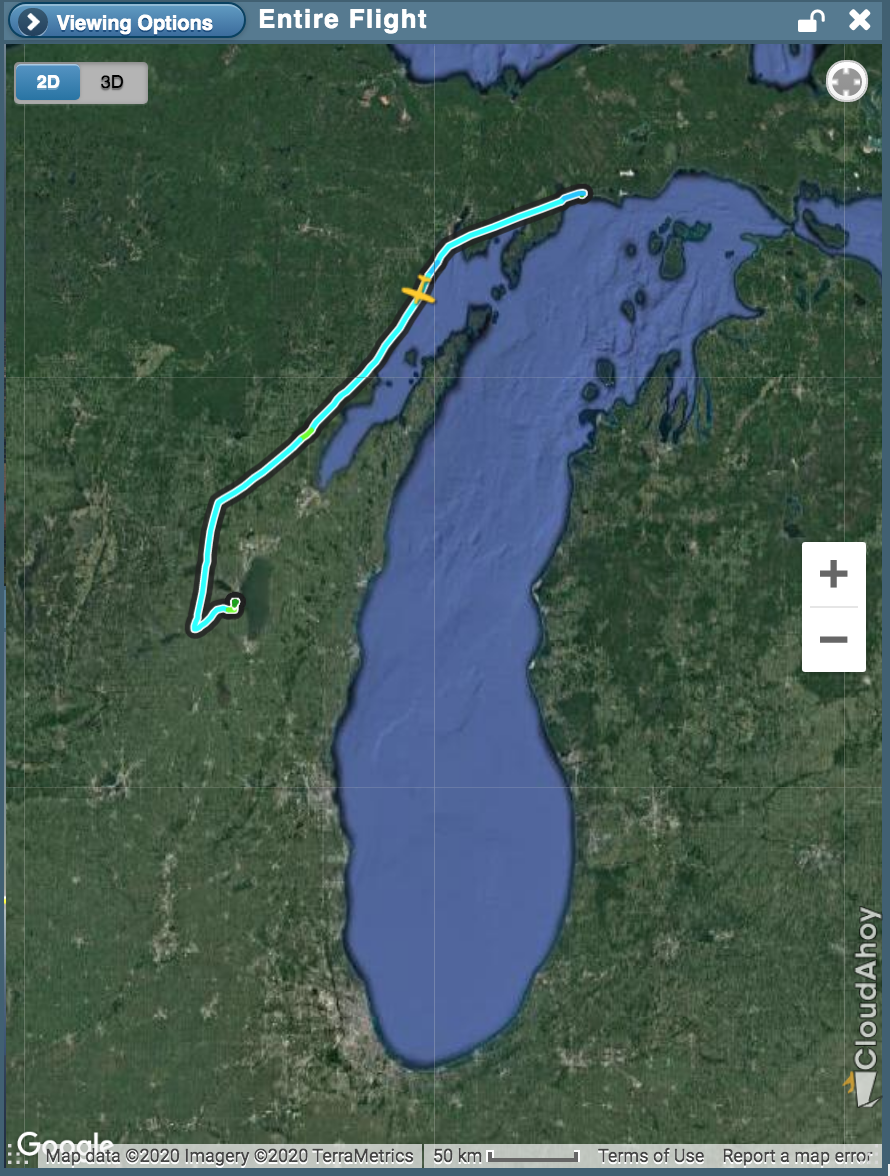
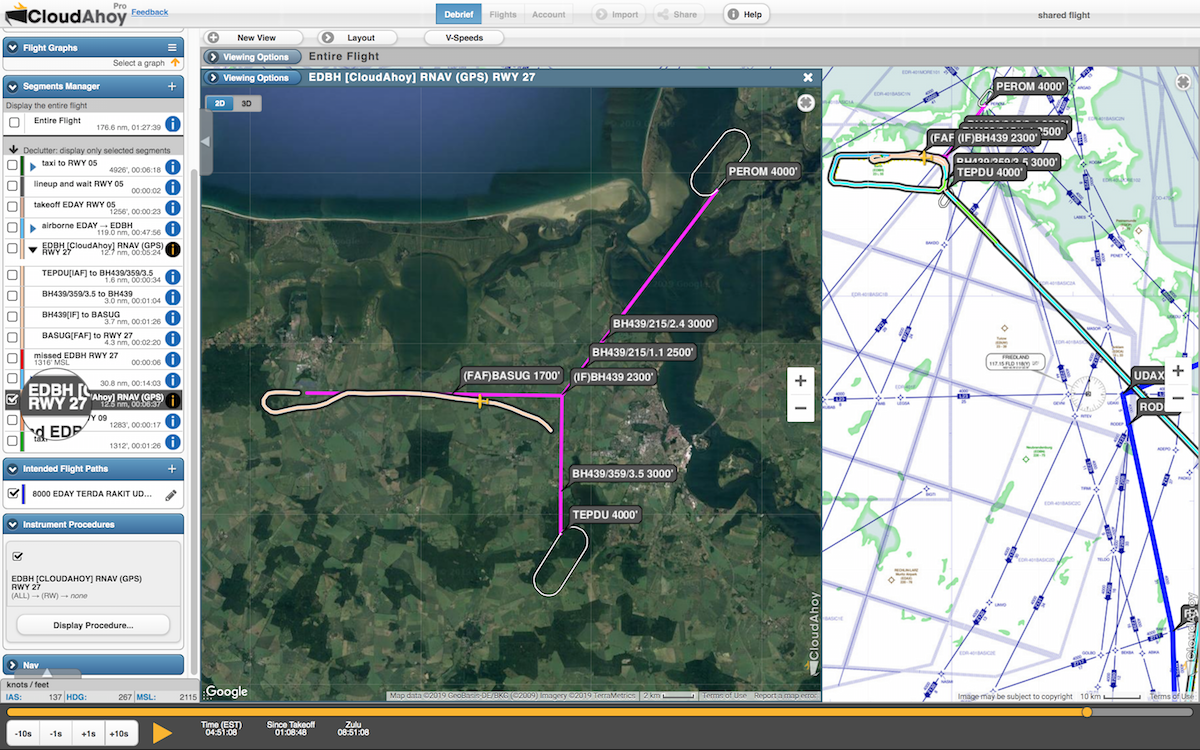
Next, ATC directed us to fly to the “mid-span” of the San Mateo Bridge. Before our flight I was told that the mid-span is halfway between the flat part of the bridge, not the entire bridge. I was given the tip of how many poles to count, but that felt like too hard of a task my first 10 minutes into this rusty pilot’s flight. So I appreciated taking the time with my CloudAhoy debrief to actually validate that I did this correctly, with both a satellite and VFR chart view to reference.

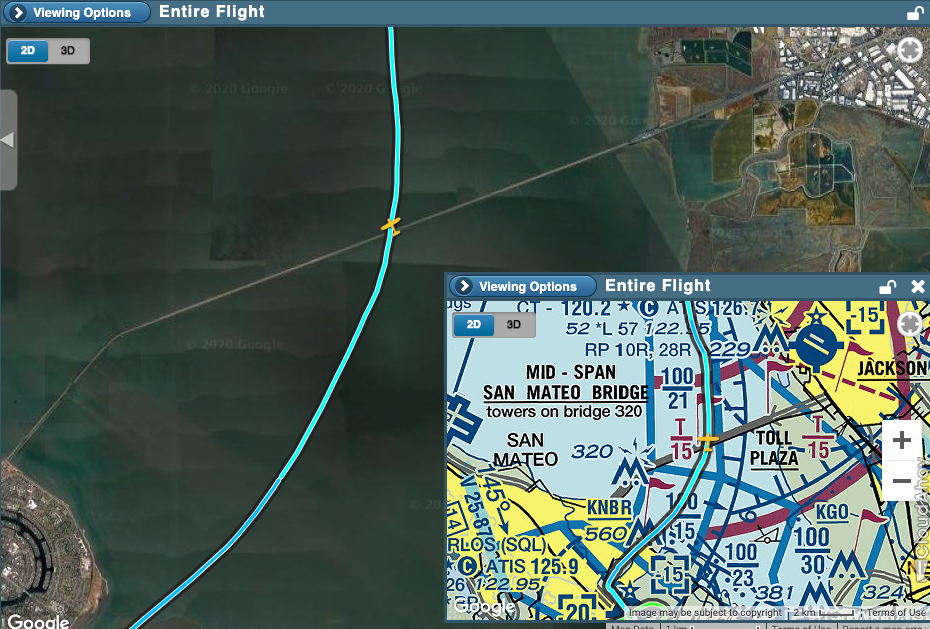
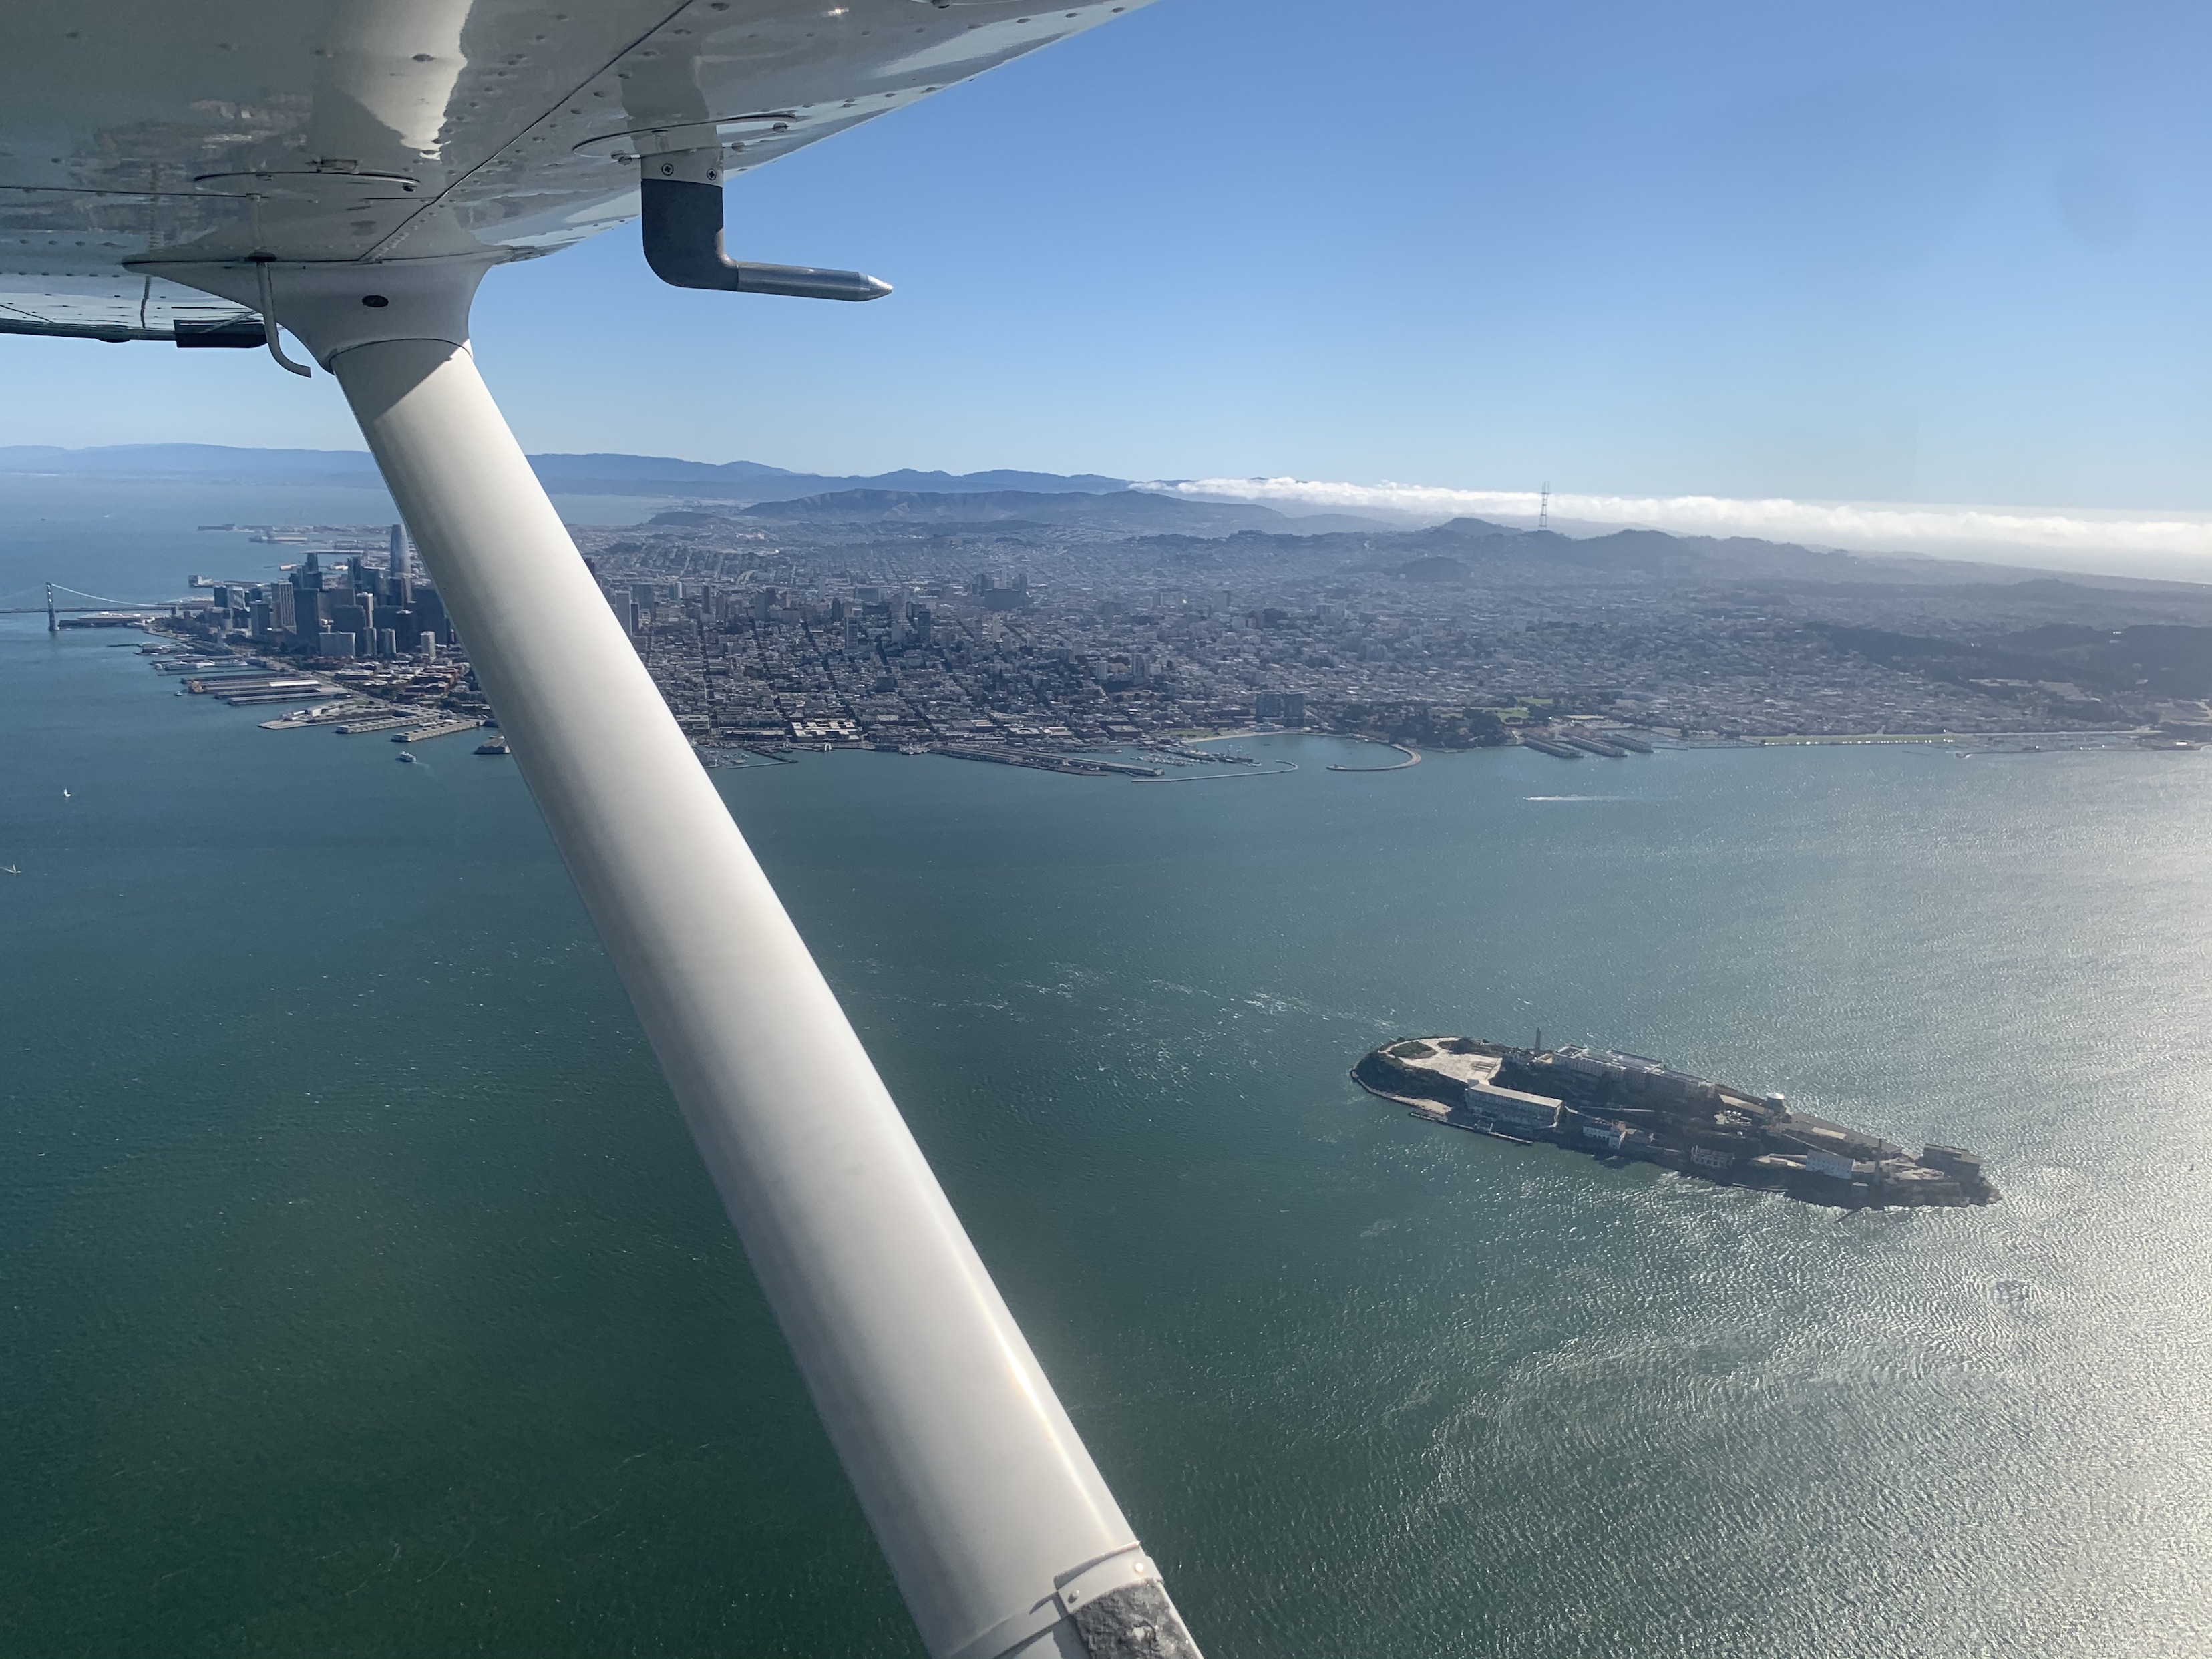
Bay Bridge, Alcatraz, Sausalito, and the Golden Gate Bridge – what a site to see!
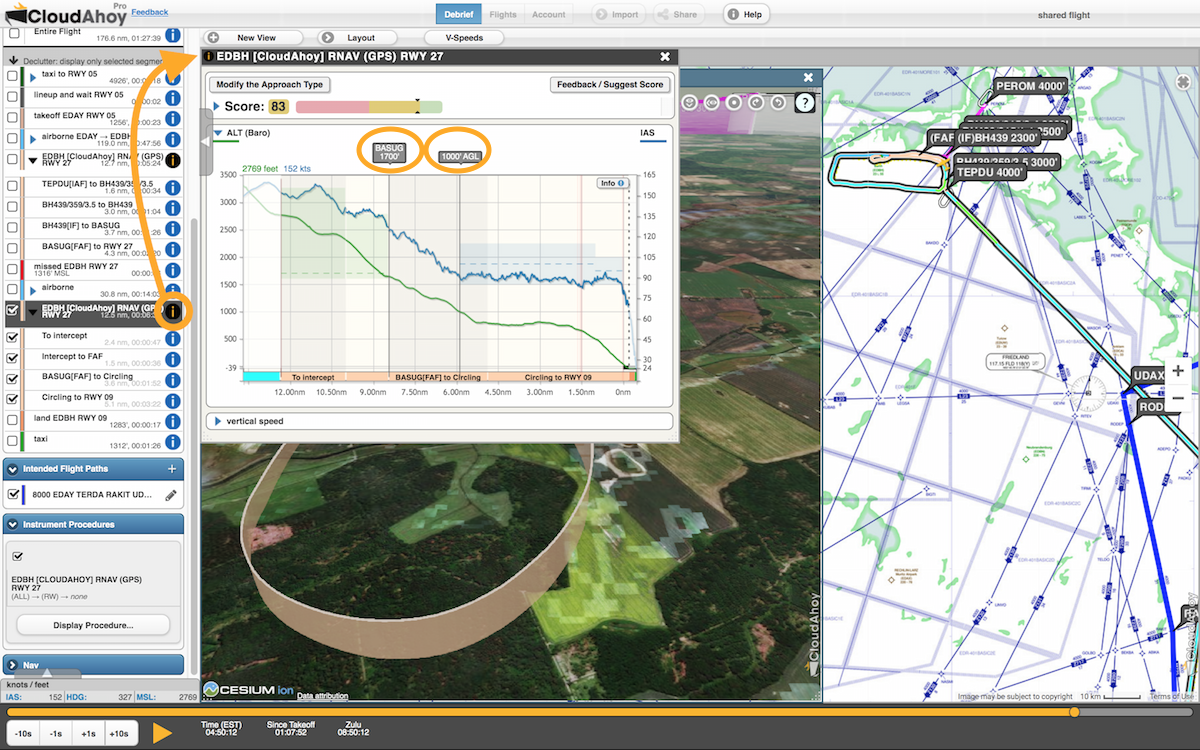
This segment was a nice relaxed time to just fly and look outside. ATC wasn’t concerned about us and we could do some circling and touring around. I was supposed to maintain 1800 feet. Overall, I feel like I did okay, but I do see some dips in altitude that I hope as I fly more become less of a trend (see graph below). I did voice to my instructor that I needed to physically relax and loosen my grip on the control, as even my shoulder was starting to feel tight. 

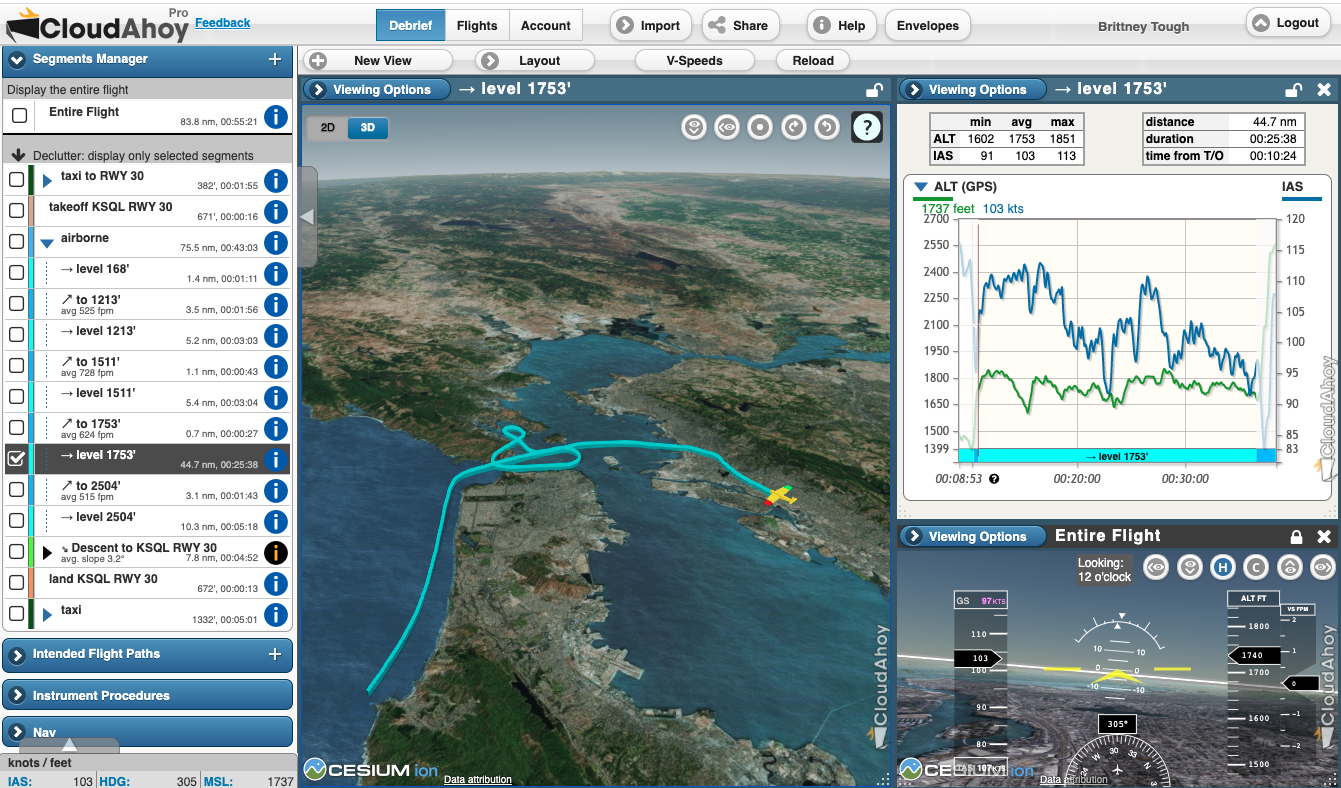
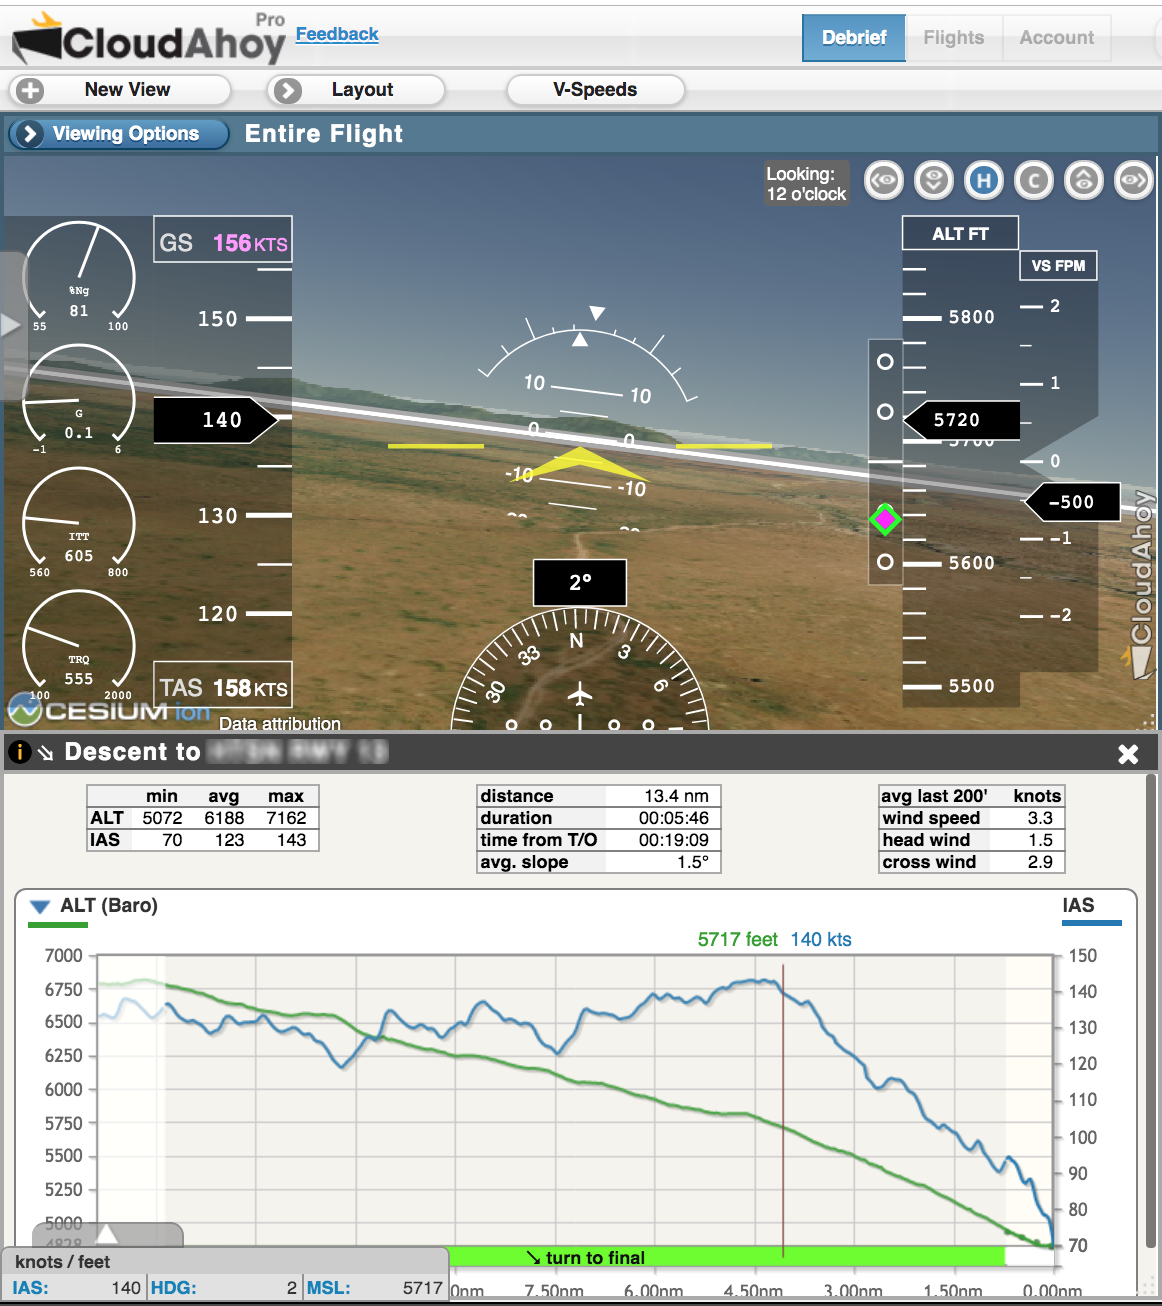
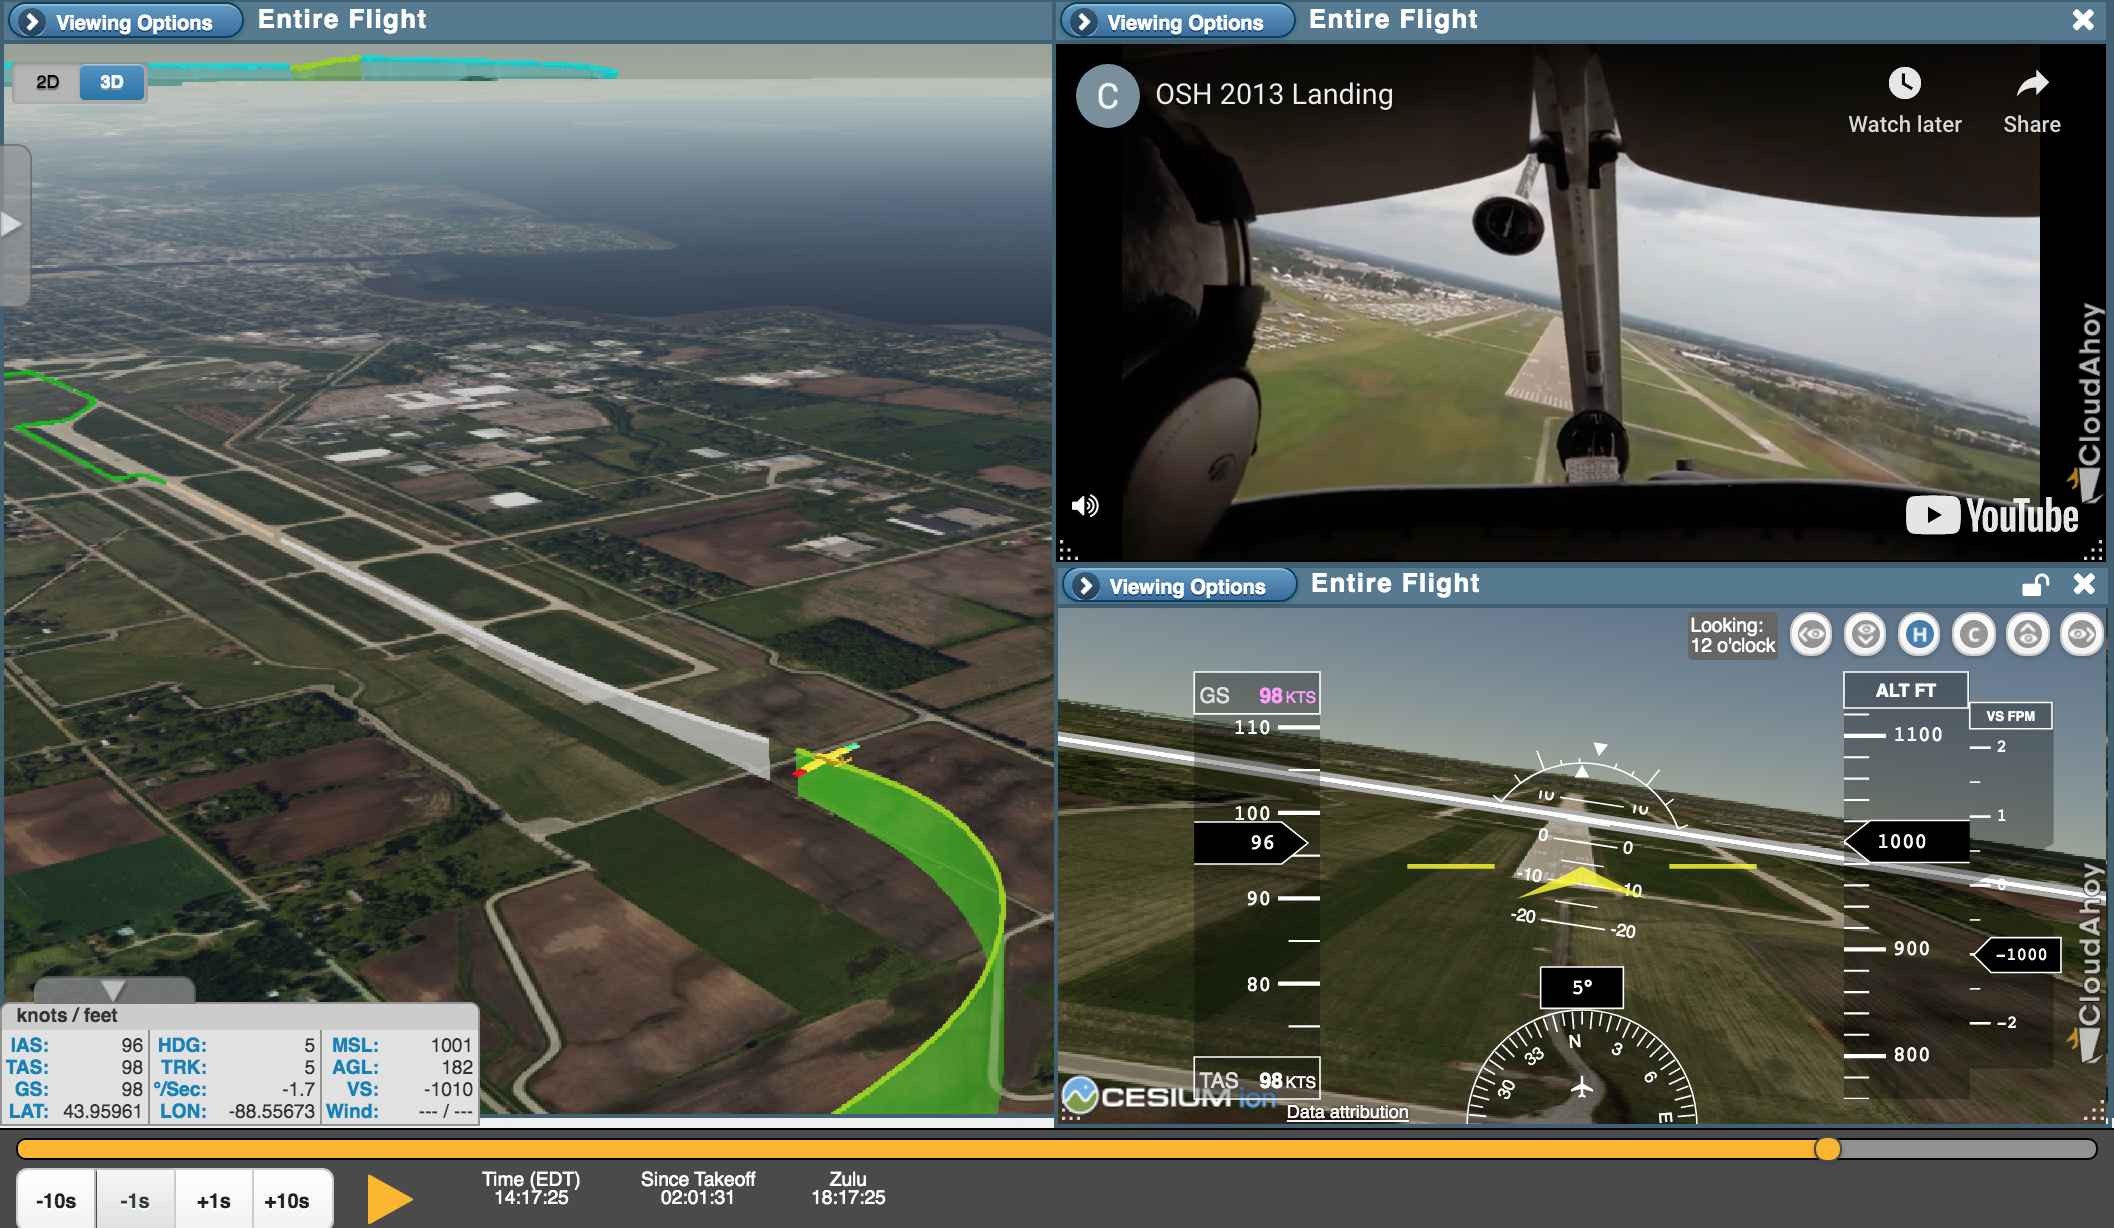
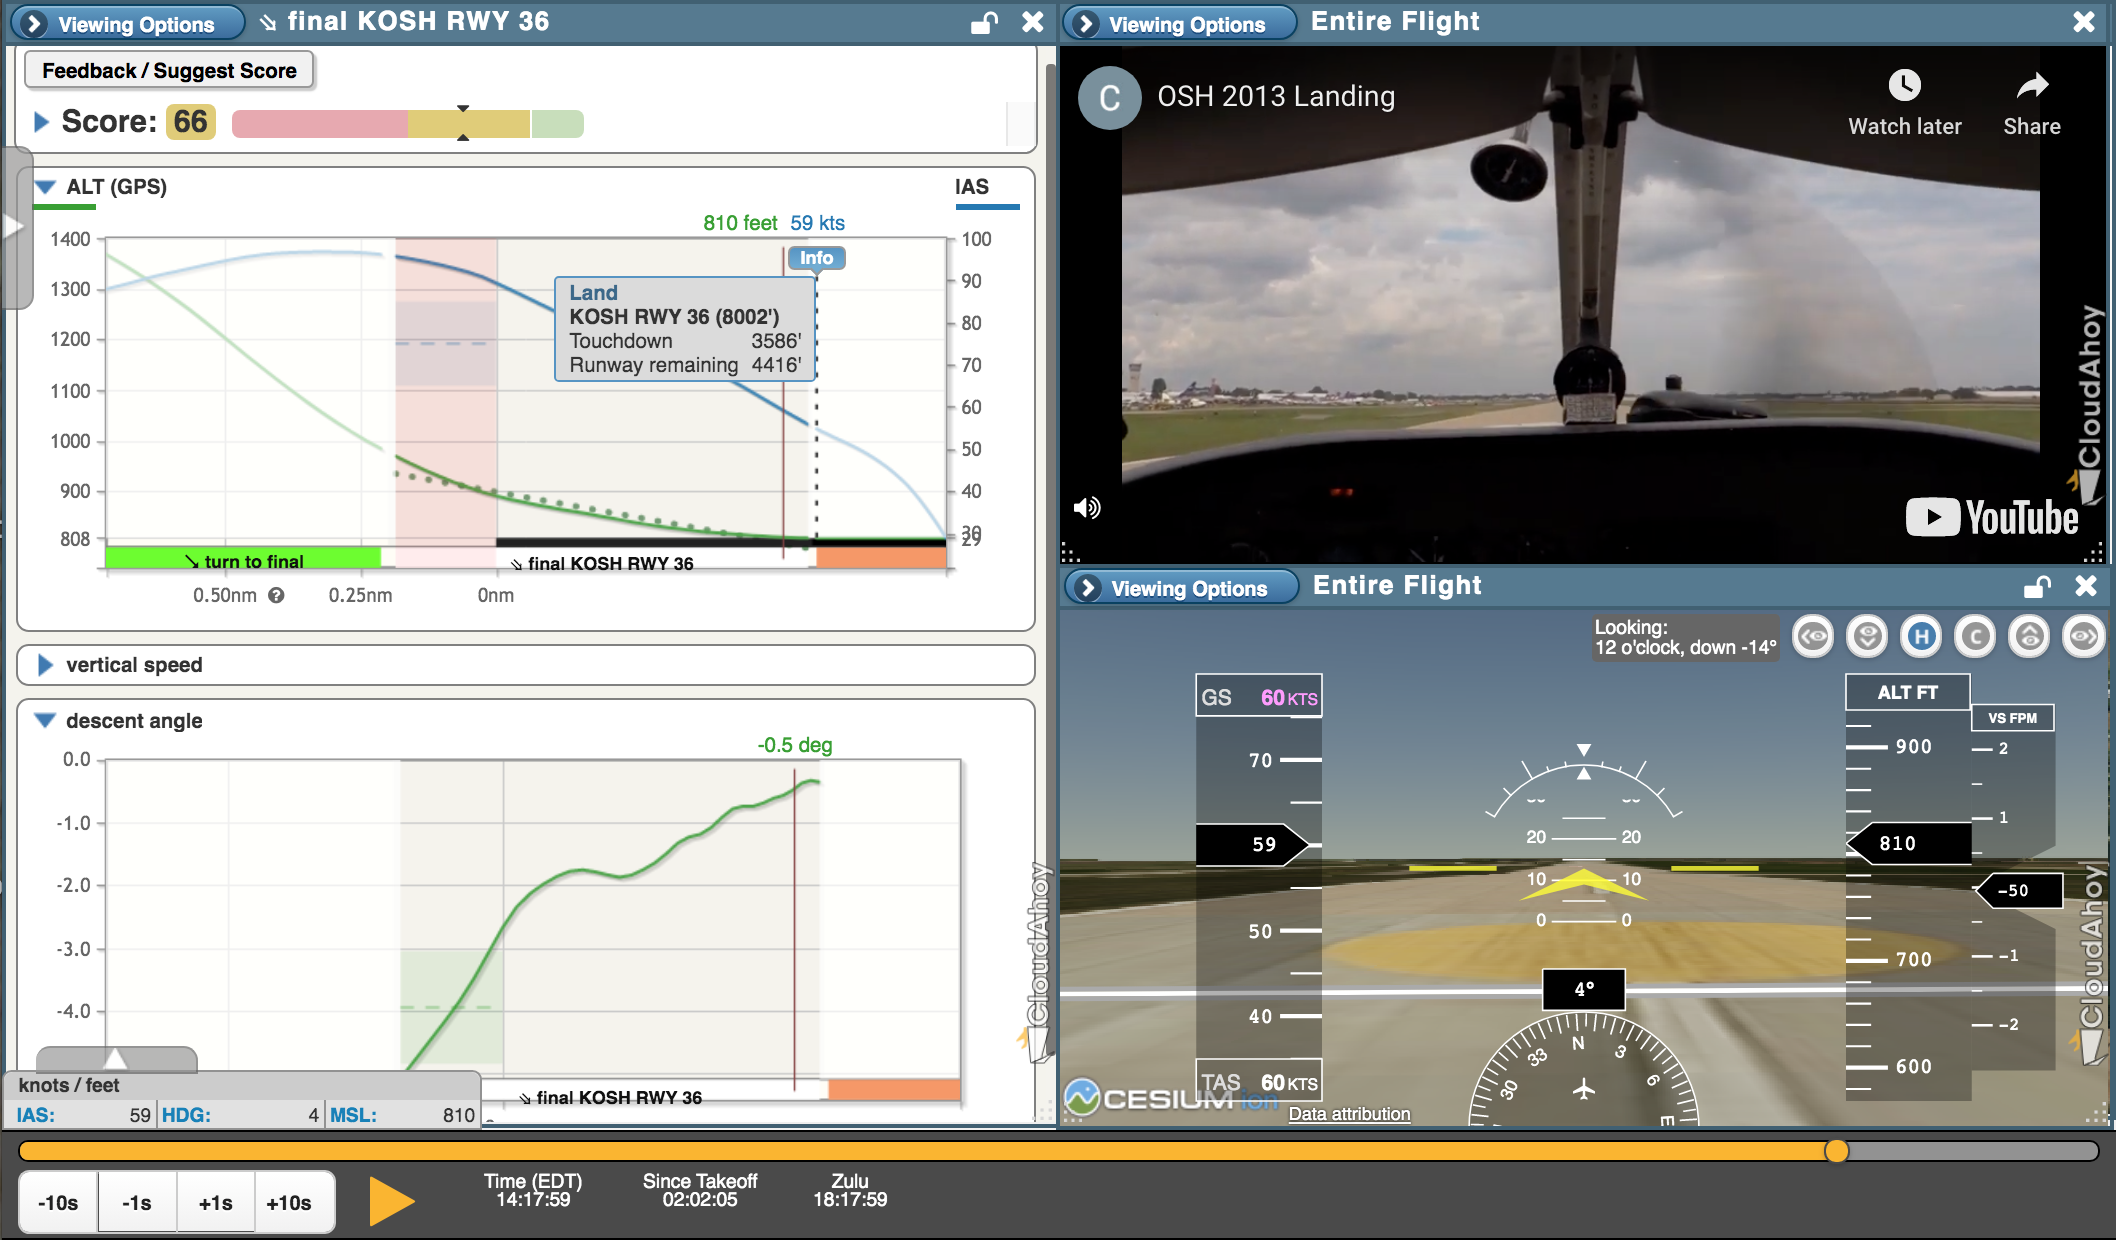
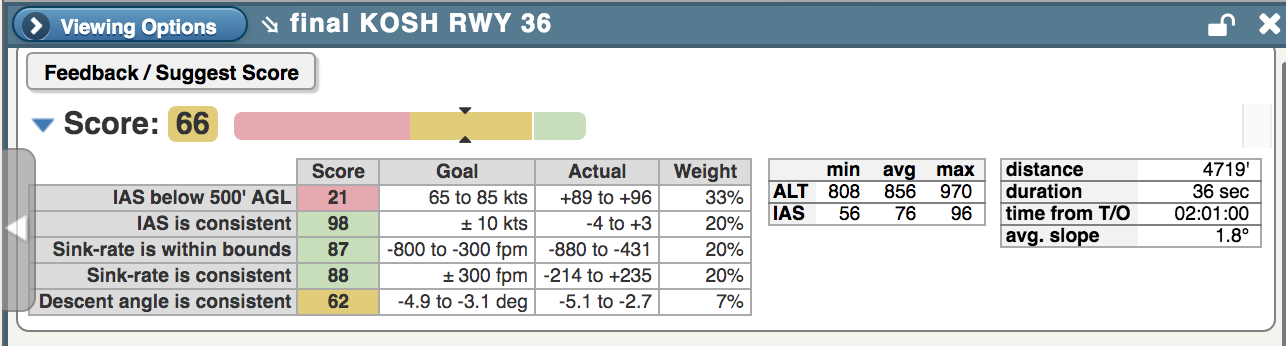
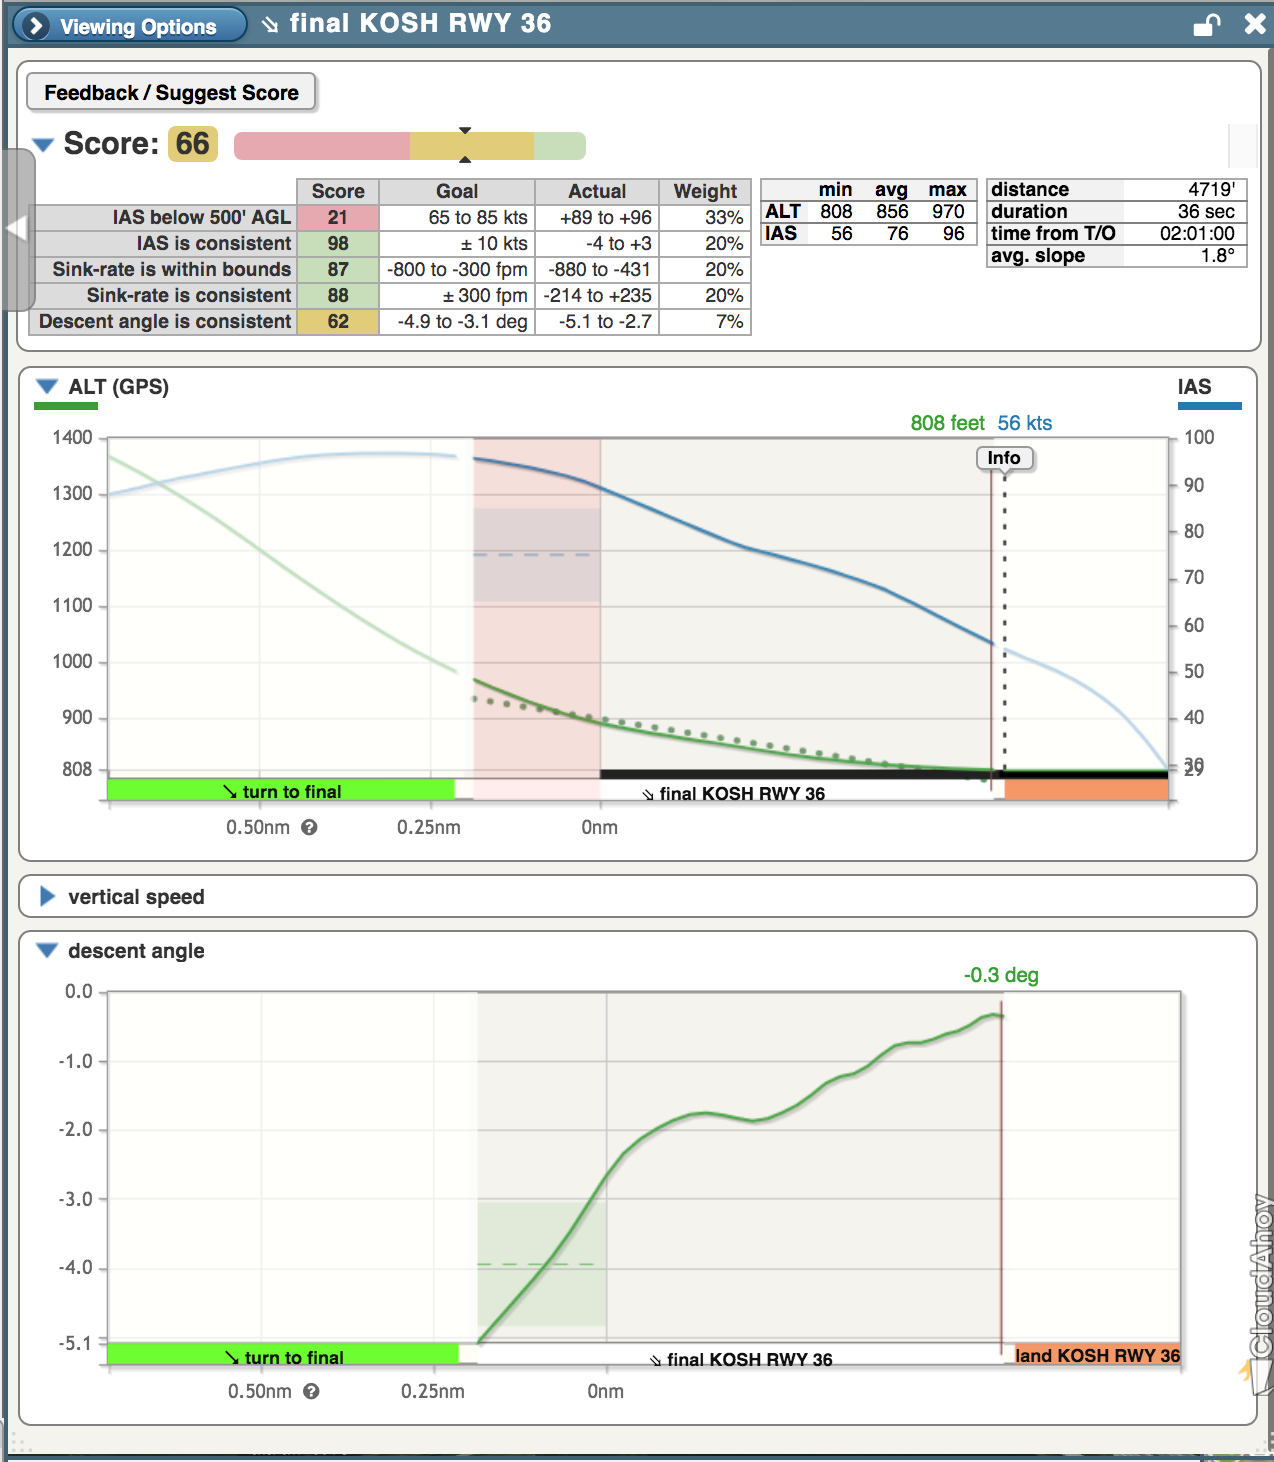
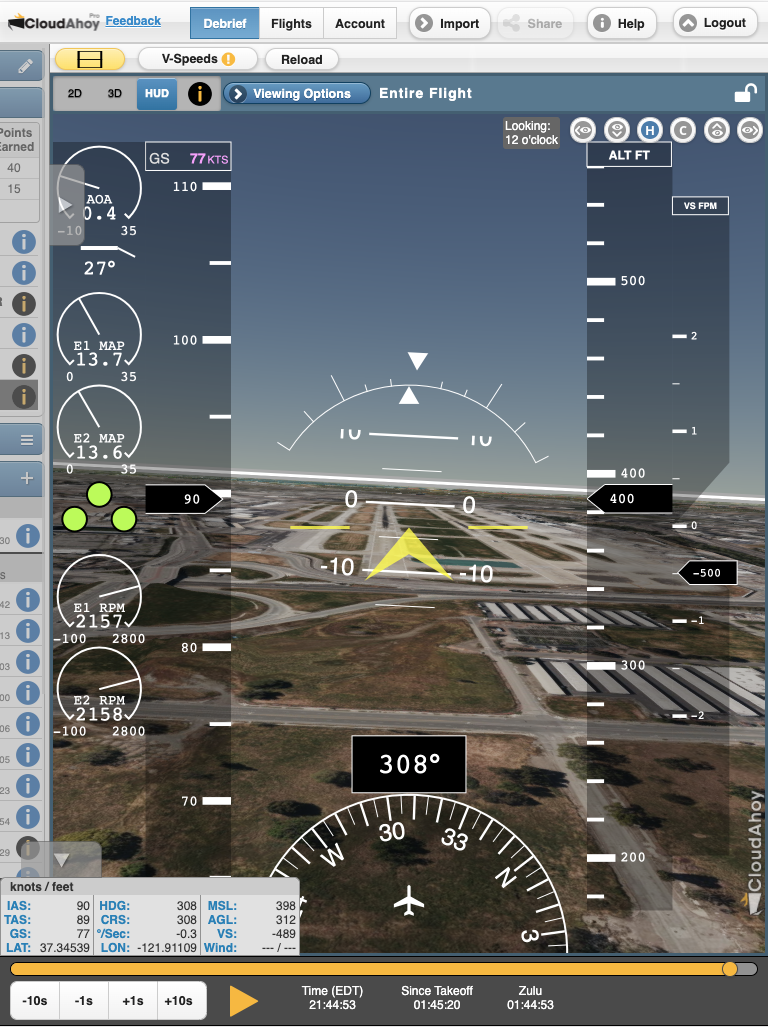
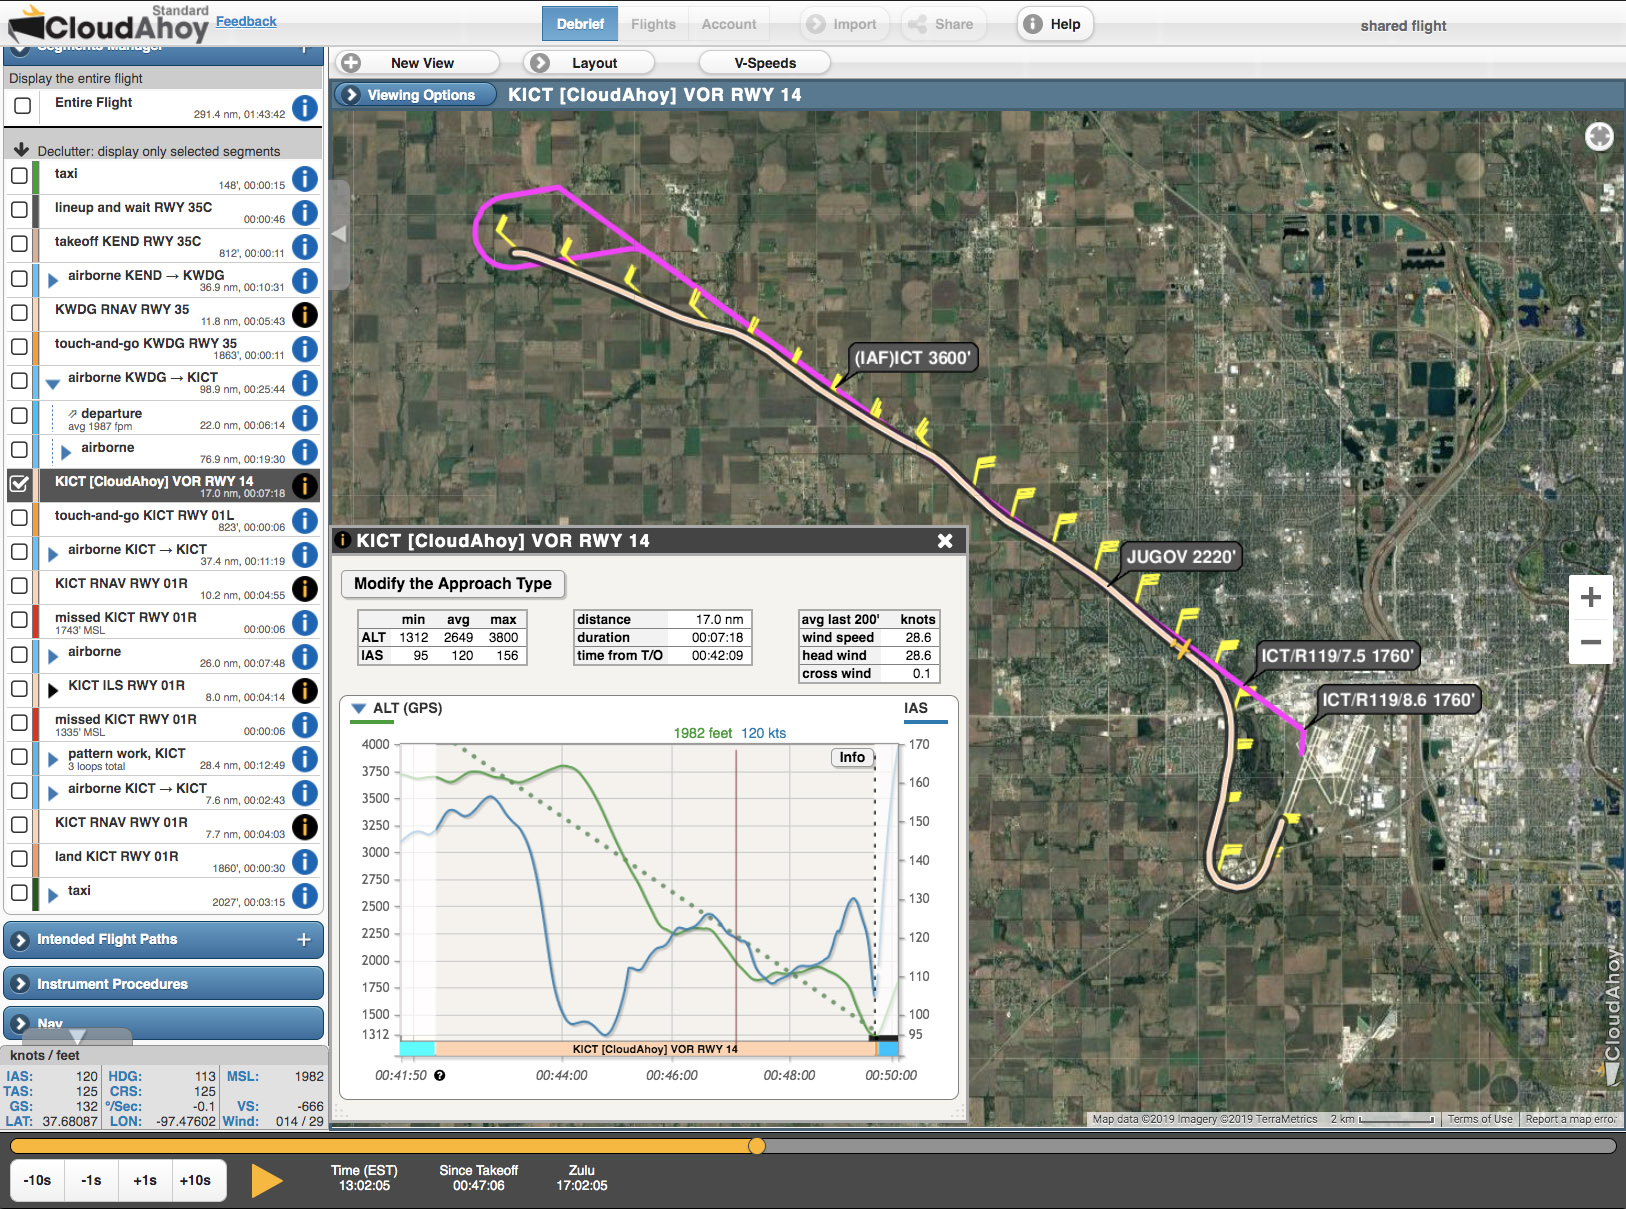
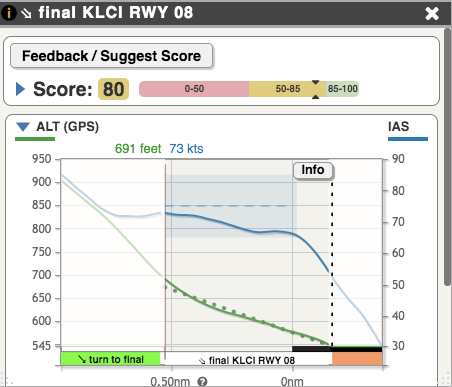
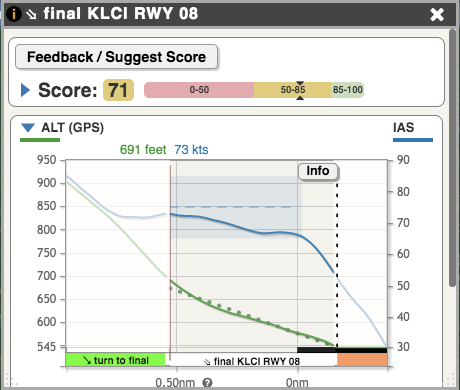
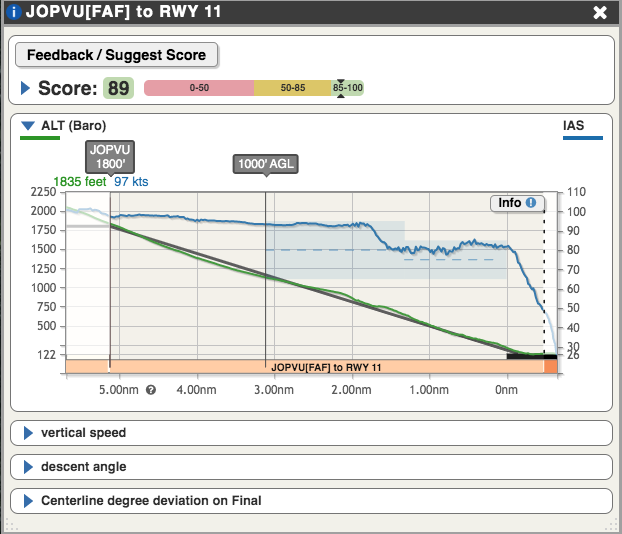
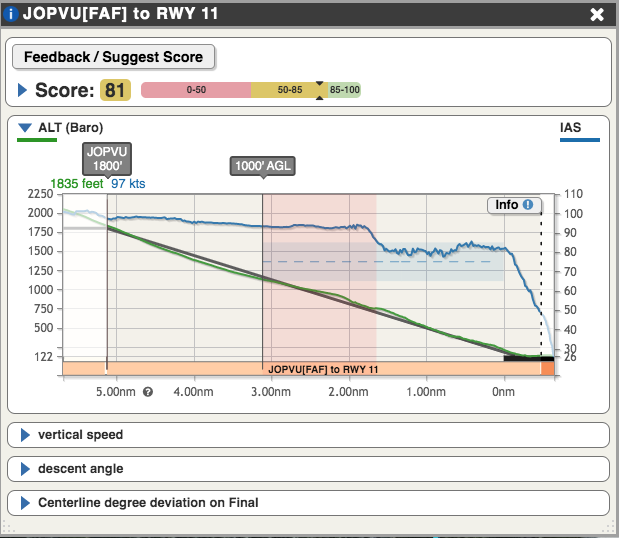
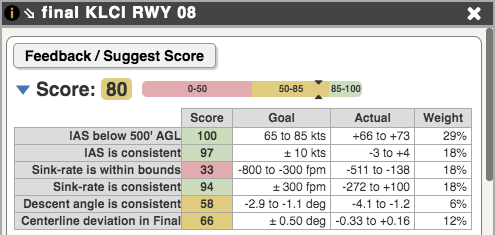
Next we flew along the coast line and then climbed to prepare for our route back to San Carlos. I felt like I had good situational awareness and was able to overfly the runway then enter a right downwind as instructed. I was to fly over SQL at 1300 and so I had to lose 500 ft to reach traffic pattern altitude. I probably should have extended my downwind a bit to give myself time to get better established with a more consistent descent angle.  CloudAhoy’s CFI Assistant feature scored my final approach a grade of 77. While it isn’t in the green range, it was a good place to start and now I can measure my improvement. I knew I wasn’t doing a good job holding the centerline and of course, this grade confirms how I felt in flight. 

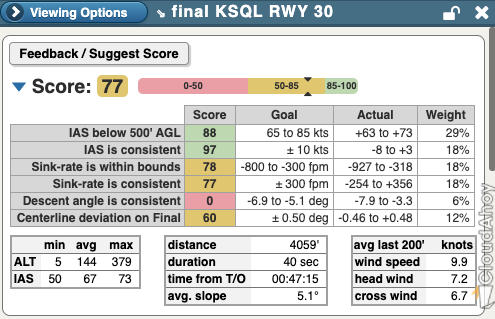
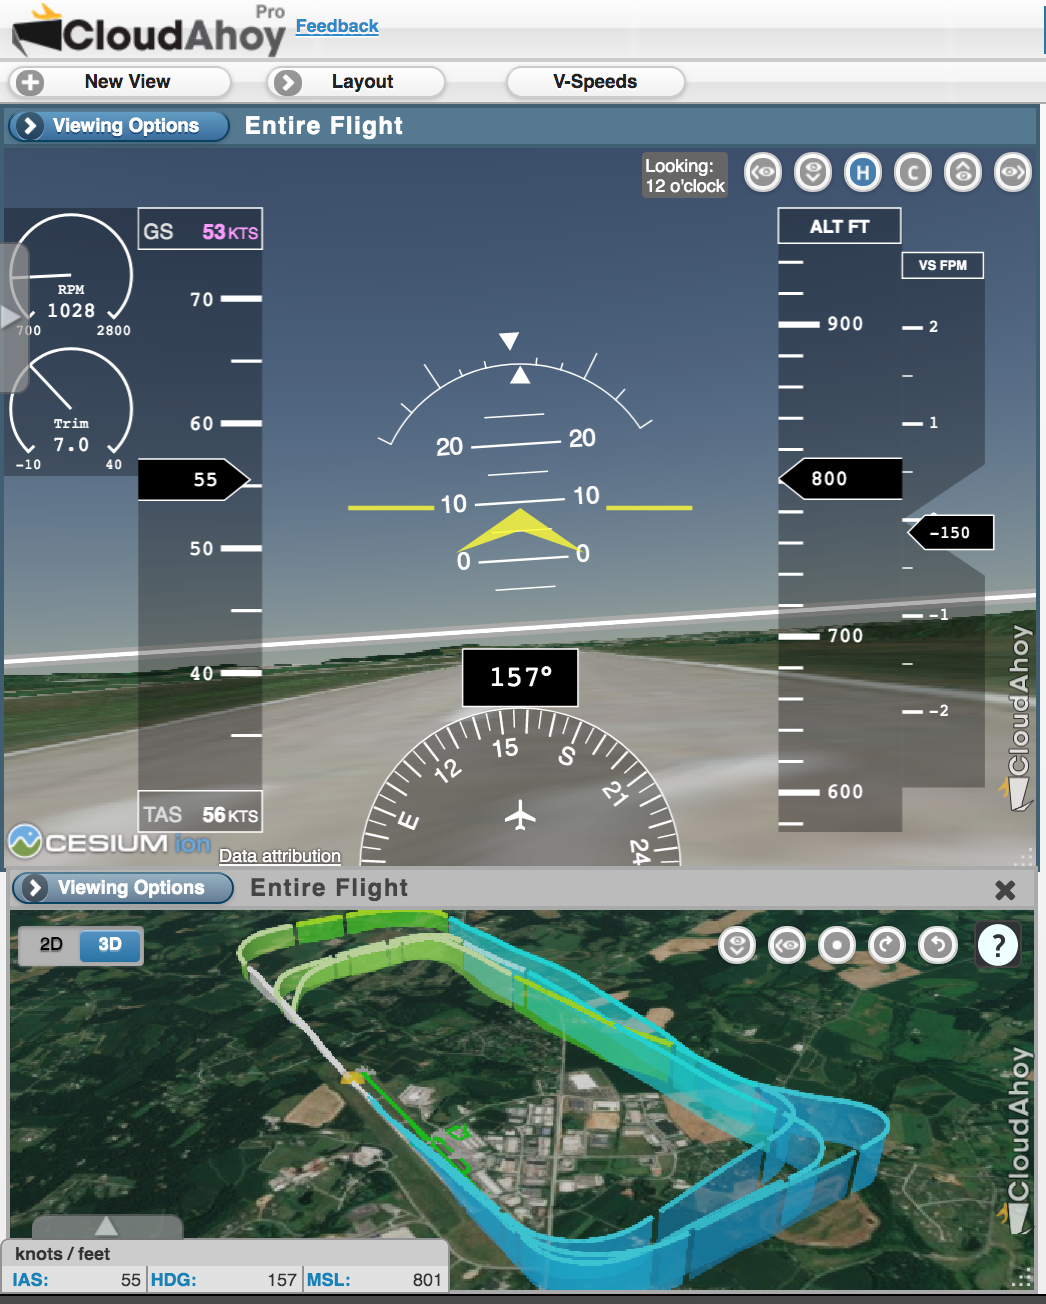
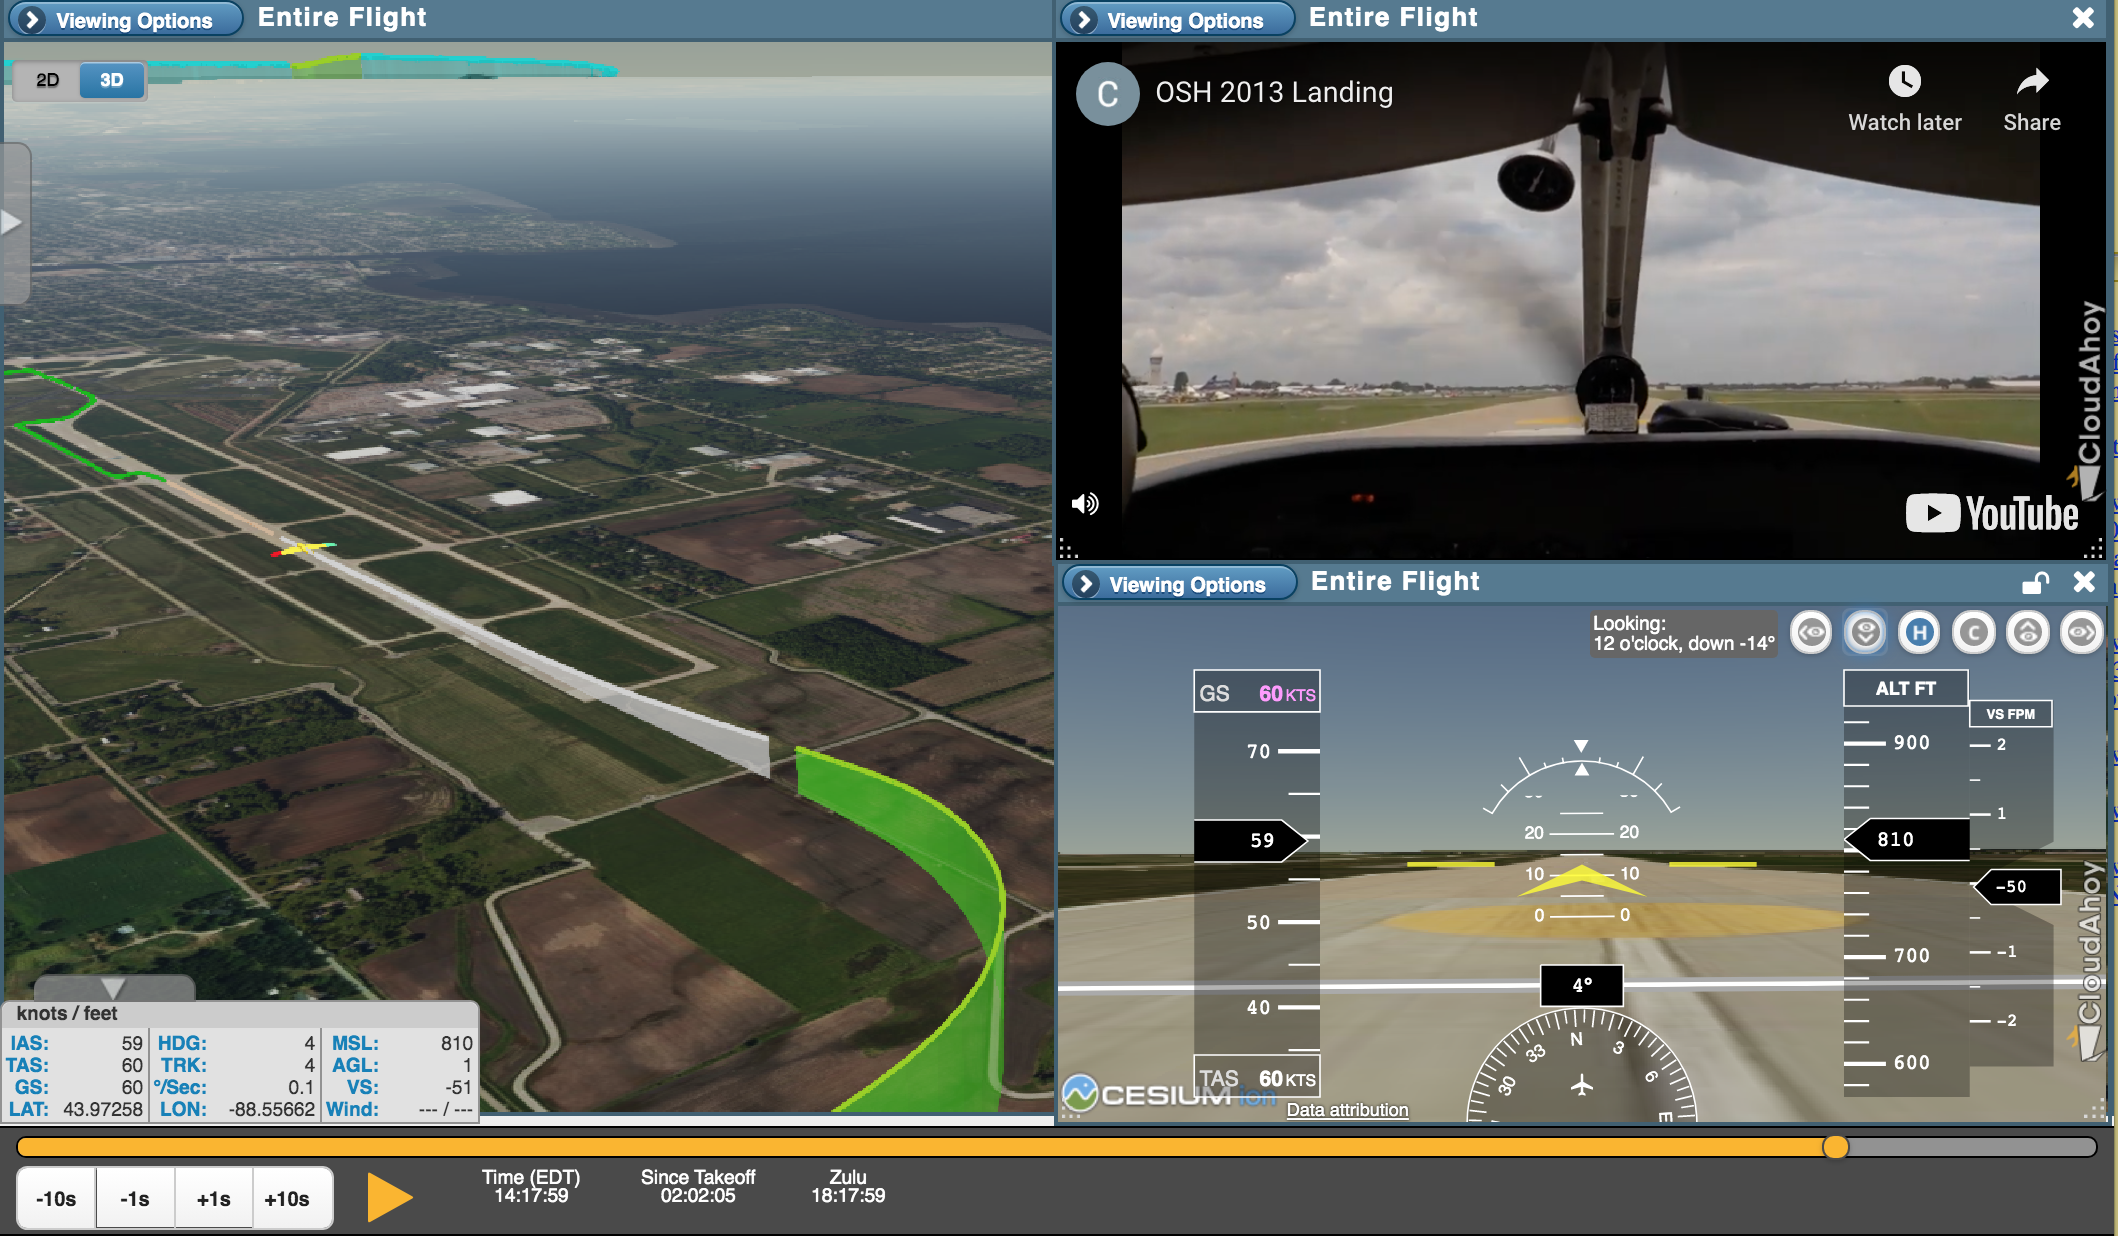
For my first landing in many years, I thought it was okay. I don’t think I impressed anyone, but it wasn’t a horrifying smack down or anything. I definitely needed to add some power during the flare, but then it was too much power, so I floated, but it was an eventual fine touch down. I’m pretty sure the instructor didn’t touch the controls, she just gave some helpful verbal guidance on the finesse of the flare and final few seconds. 

This bay area flight was the highlight of my week. I’m glad to be back in the air. I recognize many areas for improvement and look forward to the fun challenges ahead as I continue to knock the rust off. 

Do you have any advice for Britt? Send her an email at britt@cloudahoy.com.

Britt’s Rusty Pilot Blog #1 – Initial Thoughts

Our new Head of Marketing and Training, Brittney Tough, is returning to the flight controls after 3 years away from general aviation. She has created a blog series to share her experience and flight debriefs as she knocks the rust off. While this is not an informational blog that highlights the features of CloudAhoy, as we usually post, we hope you enjoy following her journey and that it may inspire you to get back to flying and motivate you to keep your flight proficiency strong. 

Initial Thoughts

I haven’t flown in almost three years. Not. At. All. I’m surprised and a bit embarrassed to see that written down. Me, a commercial pilot and CFII with over 1,000 hours, rusty and not confident. Even three years ago I would only fly with an instructor because I wasn’t flying enough to stay current or truly proficient. Sure, I would get my flight review sign off, but according to my logbook, I haven’t flown solo or as the true acting pilot in command since 2015. Yikes. I tried not to let flying go, but in early 2018 after many months of paying dues to a flying club I hadn’t set foot in, I had to cancel my membership. And after that, I was out of the general aviation community and nothing pulled me back. I had also started a new job, felt stressed over important deadlines, was commuting and traveling (too much) for work and chose to spend my time and money elsewhere than at the controls of an airplane. I also got engaged, got married, and spent two wonderful months in Australia. Life, as they say, had gotten in the way.

During these years away from flying, I moved from Texas to Northern California and I was getting rustier and rustier. I also felt the added intimidation of flying in new and complex airspace with no local airport friends to talk with about it. It was just another reason that made getting back to flying feel like a bit too much work. 

But, life has settled. I am in a new position that I love (thanks CloudAhoy), and I really miss flying. So, it is time to put aside any fears of embarrassment and the intimidation from being away so long and head out to the airport.

I’m type A, so I like a solid plan and a checklist of how to get it all accomplished. As I began to put my plan into action, I made a list of all the things to consider. It did get a bit overwhelming at first, but it also got me excited and I felt even more of a pull back to the sky. 

All the things I was thinking about, worrying about, and wanted to do: 

  • Subscribe & learn EFB technology (I was never a solid user) 
  • Get a current medical (I joined a local pilot Facebook group to get AME recommendations)
  • Get renters insurance
  • Steam gauge or glass cockpit?
  • Where can I fly for fun? Where are the $100 hamburgers and neat places to discover?
  • How am I going to commit to staying current and active after this?
  • After the flight review, it will be a “re-solo” type of milestone, how’s that going to feel?
  • Who will help me push the airplane back when I fly by myself? I’m kind of wimpy. (Laugh if you will; it is a serious concern of mine.)

So many things to consider and do, but I’m excited to get to the airport and into the left seat. It is certainly time to knock this rust off. I’ll just take it step by step. The great thing is that I “just” need a flight review. A flight review, no matter how long you’ve been away from flying, cannot be as scary or as intimidating as a checkride because you can’t fail a flight review. You just keep learning and keep flying until you and and your instructor feel you are ready to receive the endorsement in your logbook. And that doesn’t seem so bad at all! I literally cannot fail. Time to do this.

Do you have any advice for Britt? Send her an email at britt@cloudahoy.com.

(The good days of college, when I got to fly all the time! Circa 2005.)

Landing on the Yellow Dot at KOSH – Relived

Written in 2020, the year AirVenture was cancelled

Chuck uses CloudAhoy to relieve a memorable flight, flown 7 years earlier.


Converging traffic!

I was on the left base to runway 36 when I saw at my 2 o’clock a Bonanza on a one mile final. Seeing converging traffic almost on a collision course rings all your alarm bells. Normally I would immediately abort my approach and initiate an evasive maneuver, but this was not a normal flight. The tower was fully aware of the situation. 

On that day, the tower had a banner “The World’s Busiest Tower”. It was seven years ago, on July, 30th 2013, and in one minute I would land on the yellow dot on KOSH RWY 36, after flying the Fisk arrival.

Now it’s 2020, the year Oshkosh did not get to be busy.  I took my time to relive that memorable flight. A year later, in 2014, we would have a booth at AirVenture, and, sadly, I could no longer afford to take a few days off to fly my own plane to KOSH. 

Relive

Landing – I was assigned the yellow dot.

End of the turn to Final, with CloudAhoy’s 3D Cockpit view (bottom-right) and embedded video (top-right) .

I did my best to touch down exactly on the yellow dot. How well did I do? Not so great. 

Flying past the yellow dot (3D Cockpit View, looking down)

Landed.

My hand gesture as caught in the video reflects my frustration after touchdown, missing the yellow dot.

Reliving the flight was emotional and fun. Admittedly, I watched the landing more than once.

Watch capture of the landing on CloudAhoy:

Was it a good landing? 

As is well established, a good landing is one you can walk away from. In this case it was an amazingly good landing: not only we could all walk away, but it was on KOSH soil during AirVenture! CloudAhoy was great to relieve the flight.  But there’s some interesting debriefing to do.

Debrief

First I looked at the touch-down and yellow dot.  Indeed, CloudAhoy confirms my frustration. The touchdown was 3586’ from the runway’s threshold. The yellow dot is 3300’ from the threshold, and I missed it by 286’.

Looking at the graph with the 3D Cockpit view :

Then I got curious how stable my approach was.  The automatic scoring did not exist in 2013, but now I could see my score:

I lost most of the points on airspeed. CloudAhoy reported airspeed of 89-96 knots between 500’ AGL and the runway threshold, while for the Warrior the goal was 65-85. In my defense I can say that since I intended to land long, I flew faster over the threshold than I would for normal landing. Still, I should have been slower. 

The other contributor to the low score was the descent angle’s consistency. I was approaching the runway pretty much on the glide path, but then I flew pretty low over the runway.

* * *

Where is the video?

While looking at the flight with CloudAhoy, I had a moment of confusion: I remembered that Etan (CloudAhoy co-founder) took the video of the landing from the back seat.  However, I could not see it in the flight debrief… why?  Then I remembered – the feature to embed a video in CloudAhoy was added a year later!  (blog-2014/08/18/video-embedded/)  So I dug up the video and added it. 

Relieving this flight is a prime example for using this feature 🙂

Turning to final, OSH parking now visible on the left in the video – what a sight!

* * *

The trip

The trip from KBED to KOSK took us 4 days (originally planned for 3, but we added a day due to weather).  A leisure trip, four friends, two airplanes:  Eldar and I alternated left seat flying in a rented Warrior, with Etan in the back. Itay was flying his Beech B-19 Sport. 

We spent the last night before OSH on the beautiful Mackinac Island. In the morning a horse-drawn taxi brought us to the airport. 

Pilots’ briefing in  a horse-drawn taxi

Final leg KISQ to KOSH


From KMCD, Eldar flew our first leg, only 9.5 minutes of air time, to 83D where we fueled (no fuel on KMCD).  He then continued to KISQ.

We swapped seats, I took off, and landed 1:59:30 hours later just past the yellow dot.

It was delightful and nostalgic to dig out the old OSH flights, and remember the jokes we exchanged on the radio (we used frequency 123.45 for chatting between the two planes).


Oshkosh!

We are here.

DSC08805.jpg

The entire crew (and a friend)

DSC08824.jpg

Oshkosh grounds 2013


Debrief on your iPad

Debriefing directly on the iPad has become increasingly popular.  To adjust to the small size of the screen relative to desktop or laptop, we redesigned the tools and layout of iPad debriefing:  by default there are two views, and the left panel (including the Segment Manager and tools) is initially collapsed to preserve space.

The new iPad interface is available on both CloudAhoy Standard and CloudAhoy Pro.

Select either a single view on the entire screen, or split it into two views. Open or close the  left panel to see the Segment Manager and the Tools – Graphs, Nav, etc.  Below are a few examples:

Default view showing a visual approach:
(Screenshot: landscape, CloudAhoy Pro)

Opened the left panel to declutter and show only one of the three closed traffic patterns:
(Screenshot:  portrait, CloudAhoy Standard)

After tapping the selected traffic pattern in the Segment Manger, the left panel auto-closes:

Select any display mode for each of the two views: tap to select between 2D, 3D, HUD and Info. Tap the Options button to further select overlays including aviation charts and wind vectors.

Sometimes you may want to display one view on the entire screen. If two views are displayed, close one of them and the remaining view will grow to fill the screen:
(Screenshot: CloudAhoy Pro, debriefing an X-Plane sim fight)

Giving CloudAhoy Pro for 30 days to all – Relive Your Past Flights

We are living through difficult times, and everyone is affected in a significant way. Aviation has been hit hard by the coronavirus. Many of us aviators are grounded all around the world. Yes, including myself and all the other pilots in CloudAhoy.

To keep the aviation spirit during this time, we decided to do something special.

We are opening CloudAhoy Pro for everybody for 30 days.
Debrief and relive your past flights!

During this time many of us cannot fly in the sky, but we can be engaged in flying by other ways. One way is to relive past flights- for fun, for learning, or to share.

Coupon: PILOTSFLY
        – 30 days of CloudAhoy Pro –
        – Applies to everybody – 

To relive your past flights  – 
You can debrief any flight already in your CloudAhoy account  – look at the Flights tab.
You can import flights into CloudAhoy from your SD card – G1000/3000, Avidyne, etc.,
You can import  track logs from ForeFlight, Garmin Pilot, and many more.
See https://help.cloudahoy.com/importing-flight-data

The coupon PILOTSFLY can be used by everybody (except organization users) to get 30 days of CloudAhoy Pro. Expiration date of current subscribers will be extended. It will also be applied if you purchase or renew now – and a very special Thank You for doing that!

To use the coupon – 
– Login to your CloudAhoy account on
the web (not from the iOS app!)
– Go to the Account tab
– Scroll down to the “My Subscription”
section
– Click or tap on the “Coupons” button
 a dialog box will appear
– Enter coupon code: PILOTSFLY
– Click the “Submit” button
Detailed instructions in https://help.cloudahoy.com/subscription-coupon

On behalf of the CloudAhoy team I would like to thank everybody who purchased CloudAhoy in the last few weeks, your support is even more important than ever.  Enjoy the extra 30 days with the coupon.

To all our users wherever you are all over the globe – stay safe!  Hope the PILOTSFLY coupon will give you moments of aviation-joy.

See you back in the air soon!

Chuck Shavit
and the CloudAhoy team
cloudahoy.com

Circling Approaches: Identified and Scored

We enhanced the flight analyzer’s -circling approaches now automatically identified.  This is available in both CloudAhoy Standard and CloudAhoy Pro.  If you have CloudAhoy Pro – it will have the additional information like with any instrument approach: waypoints, and scoring by CFI Assistant.

Circling approach – Auto-Segmentation

CloudAhoy now automatically identifies a circling approach and it is added to the segment list.  This is available for CloudAhoy Standard and Pro (Pro users have more details – see below

Example:

Circling Approach, 2D view (Click to enlarge)

Circling approach, 3D view (Click to enlarge)

Circling approaches in CloudAhoy Pro

Like with any Instrument approach, CloudAhoy Pro, an instrument approach is listed in the Segment Manager as an hierarchical segment: initial intercept, and then a subsegment for each waypoint.

Circling approach with waypoint. [Barth, Germany] (Click to enlarge)

Segment Info, Standard vs. Pro and CFI Assistant

As always, you can click or tap on the  icon to get the detailed information.

If you are a Pro user you will get the CFI Assistant, and the waypoints are annotated on the graphs.

Circling approach – CFI assistant, waypoints are annotated on the graphs. (Click to enlarge)

In CloudAhoy Standard, the Segment Info will be displayed:

Circling approach, Segment Info – CloudAhoy Standard. Wind vectors are also displayed. (Click to enlarge)


AirSync for Automatic Upload G1000 Flight Data

Flight data from the Garmin G1000 is an excellent input for debrief.   To use it you need to import the data from the SD card to CloudAhoy.   Or – you can use AirSync and configure it to upload the data automatically into CloudAhoy.

AirSyncFor details how to configure AirSync to automatically upload flights data to your CloudAhoy account see https://help.cloudahoy.com/importing-flight-data/airsync/


Getting the rich data directly from the G1000 EFIS enhances the debrief’s accuracy and quality.  You can see engine data, gauges, fuel, and other parameters, aligned and synched with the flight segments – as seen the screenshot below (click to enlarge):

Tuneup of the CFI Assistant’s Scoring

We tuned the CFI Assistant’s scoring. If you debrief today a flight which you already debriefed before, you may notice that your scores have changed; in most cases the new scores are higher. The changes we made are a result of insightful feedback we received. It affect the scoring of both instrument approaches and visual approaches, as well as of the departure climb. Most of our adjustments were made by changing our default “CloudAhoy Basic” envelope.

Click the screenshots to see them in full size.

Example 1: Visual Approach Scoring

NOW:                                                                       BEFORE:


Example 2: Instrument Approach Scoring

NOW                                                                        BEFORE: 


Tune-up changes – Details

For those interested in the details –

Scoring of Visual Approach tune-up:
Users told us that our default envelope put too much emphasis on the descent angle’s consistency. We agree.

We modified the weights of the components making up the score. This change emphasizes maintaining stable airspeed and sink-rate, and puts less emphasis on maintaining a consistent descent angle.

Here are the score details from the examples above (revealed by clicking the arrow).

NOW                                                                               BEFORE: 


Scoring of instrument approach tune-up:
We made three changes:

  1. We now have two different airspeed goals: one for 1000ft-500ft AGL, and one for 500ft to the runway’s threshold.
  2. We modified the weights of the various components making up the score. This change emphasizes maintaining stable airspeed and sink-rate, and puts less emphasis on maintaining a consistent descent angle.
  3. We give higher weight to the decent angle’s consistency for ILS approaches.


Safe Departure Airspeed
Users told us that our altitude ranges for the departure’s scoring are too restrictive. We agree.


Summary of Changes


Your Feedback

Please continue sending us feedback!
Click the Feedback button in the segment information view,
or the feedback link on the top-left
,
or
 simply send an email to team@CloudAhoy.com.


Zoom-in on VFR & IFR charts – as much as you want

Per users’ requests, we improved the visualization of VFR and IFR charts: it is now possible to zoom-in continually in 2D Track to a very high zoom level (in addition to continuous zoom in 3D which has always been available).

You can zoom-in using the “+” and “-” buttons, using the mouse wheel, or using finger gestures on iPad and other touch devices.

** Available to all users, Standard and Pro **

The following screenshot shows a debrief with close zoom-in of VFR charts:

In this flight, the pilot was concerned whether he busted Class D airspace.  The debrief – with zoom-in of the VFR charts – shows the flight path over the Class D (‘1’ at the top of the screenshot), however class D’s top is at 4199 feet and  ALT 4712 (‘2’ & ‘3’ at the bottom-left of the screenshot),  so – no Class D violation.

. . .

“Did I bust Class D airspace?
I was flying along on a site-seeing flight when my iPad overheated in the Arizona sun. Got distracted trying to cool it down in front of a vent.. looked outside….runways! Oh no! Quick 180. Luckily Stratus 2S continued to record while iPad was off, and I was able to import that flight log into CloudAhoy.
Debrief: I was right on the edge of class D. ALT 4712, class D up to 4199 -> Legal!
Noted: Situational awareness! and I ordered a mount with a fan.”
— told by Chris

More Gauges! with CloudAhoy Pro 6.0

With CloudAhoy Pro we display gauges when available, and the types of gauges which we display keeps growing.  If your favorite gauges are not shown for some reason, let us know and in most cases we can add them very quickly.

Recently added per uses’ requests:

ITT, %NG, and Torque using the Garmin G1000 EFIS data from his Turbo-Caravan:


RPM and the trim setting from Garmin G300 EFIS: