Importing Garmin VIRB’s flight data to CloudAhoy

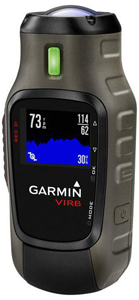
VIRBGarmin’s VIRB video camera is gaining popularity among pilots. VIRB also captures the flight’s GPS data, and that data can be imported to CloudAhoy for further debrief.

James Papafagos is using VIRB with CloudAhoy, and he was kind enough to write the bulk of today’s post. The stage is yours, James:

Uploading a .gpx file from your Garmin VIRB to CloudAhoy.

Connect your VIRB to your PC / MAC via USB and open the USB drive that should now be available.

Open the “Garmin” directory then open the “GPX” folder. You will see file named “Track_2014-9-23 145854.gpx” (for example)

It helps to have the directory view that shows the date modified so you can locate your specific flight if you have many recorded.

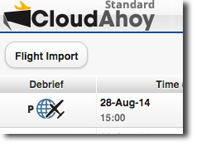
You can upload this file to CloudAhoy now by clicking “flight import”.

But… you probably have a flight longer than 20 min or so and have 2, 3 ,4 video clips and for each clip.. the VIRB created a new .GPX file. NOW WHAT?

If using a MAC, download the light version of Adze form http://kobotsw.com
You will use this to import your multiple .gpx files into one, and then upload that combines file to CloudAhoy.

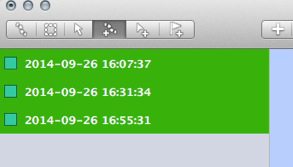
Run Adze, just drag and drop all the .GPX files for your flight

VIRB 1

Select all the tracks by clicking on the first track, hold down shift and click on the last track

VIRB 2Detail

With theses tracks selected, click on the “glue” icon (or press “command – M”)

VIRB 3Detail

VIRB 4Detail

You will now have ONE track that contains all the data from the multiple tracks you started out with.

Now, go to File, Save As.  to save the new file.  This file can now be uploaded to CloudAhoy!

Thank you James!

As always, any feedback is most welcomed.
Improvements in flight profiles display

We enhanced the flight profile display in the Debrief tab; it is now possible to:
– undock a profile, move it and resize it,
– drag the crosshair to move the timeline.profilesOvrS

profilesMenu


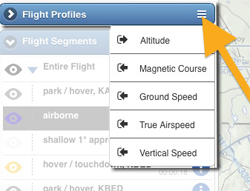
To display a profile, click (or tap) the profilesMenuIcon menu icon
in the Flight Profiles bar, and select the profile from the list.


Profiles: undock and dock
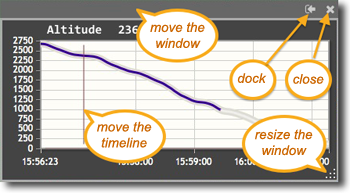
Initially a profile is displayed in the Flight Profiles section. This is called docked state. You can undock a profile by clicking the undocking icon profileDockIcon.

Once undocked, a profile can be moved and resized – see the illustration below. You can also dock it back in the Flight Profiles by clicking the docking icon profilesDockprofilesDragAreas350

To close a profile, click its X icon on the upper right, or unselect it from the menu.

Drag the crosshair to move the timeline
Each profile has a vertical line to show the current time. You can drag the line to move the current time, which is exactly equivalent to moving the timeline’s slider – but allows for better accuracy.

Persistence
If you are the flight’s owner (i.e., one of the pilots), each profile’s size and location is saved, and will be restored the next time you debrief the flight.
BTW, we now also save segment information windows segInfoIcon, and the PIP window.

Example
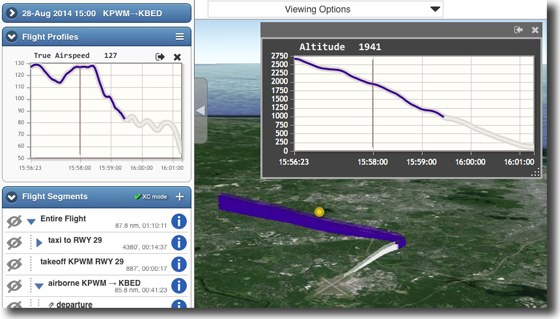
The screenshot on top was obtained by analyzing the flight in XC mode (click the XCMode button in the Flight Segments bar), selecting only the Approach and Final segments (see here about segments isolation) and displaying airspeed in docked state and altitude in undocked. Such a display can help in debriefing how stabilized the approach was.


Importing flights from Garmin G1000

G1000-SDCard-4

If your aircraft is equipped with Garmin G1000 avionics, you can now debrief your flights using high-quality flight data from the G1000.G1000-SDCard-3

The G1000 writes flight data into an SD card. To debrief the flight you need to import that data into CloudAhoy. This blog described how to do it.


Logging the flight
Important: please consult your aircraft’s G1000 manual for details specific to your aircraft.

  1. Before turning on the G1000 system, insert an SD card into the top slot in the MFD. If you are renting the aircraft, you would usually bring your own SD card. If there’s already an SD card in the slot, consult with the plane’s owner.
  2. During flight, the G1000 automatically writes the flight data into your SD card.
  3. After the flight, remove your SD card from the top slot of the MFD. You now have the flight data in the SD card.


Importing to CloudAhoy

  1. Insert the SD card in a card reader connected to your desktop or laptop computer. The SD card’s folder will appear on the desktop.
  2. G1000-SDCard-5Open the folder. It would typically contain a data_log folder, and in it the flight file in CSV format.
  3. Open a web browser and login to your CloudAhoy account.
  4. Click the Flight Import button. An Enter the flight’s pilot names, tail number and optional remarks (you can edit all these later), select the CSV file with the data, then click Import.
  5. The flight now appears in your flight list, and is ready to be debriefed.


Debriefing
The rich G1000 data can be displayed using Flight Profiles. See G1000 flight data with CloudAhoy profiles.

Import flights from ForeFlight to CloudAhoy


IMPORTANT NOTE:
This blog post is from 2014 and is out of date.
Since then much has changed in both CloudAhoy and ForeFlight!
For up-to-date instructions on uploading ForeFlight track logs to CloudAhoy please see
https://help.cloudahoy.com/from-foreflight/


It is now possible to import into CloudAhoy flights which were recorded by ForeFlight. As many of you know, ForeFlight 6.3 introduced Track Log, a cloud-enabled flight recorder (see ForeFlight’s blog). We have worked with ForeFlight on integrating this feature with CloudAhoy, and we think you would like the results of this collaboration.

Several CloudAhoy users have asked us about ForeFlight’s new feature, prompting us to write the following Q&A.


Q: I am using ForeFlight’s track logs. Do I still need CloudAhoy?
A: Yes. Flight debriefing is what we’re about, and our CloudAhoy Standard is what enables it – with things like auto segmentation and maneuver analysis, airspeed profiles, cockpit view, 3D instrument approaches, video and a lot more.

ForeFlight’s Track Logs are roughly equivalent to CloudAhoy Free, our free flight track storage and display. Both products are free and you can use either one, or both.

Check our CloudAhoy Free vs. CloudAhoy Standard comparison table.


Q: I use Stratus. Can I import Stratus data into CloudAhoy?
A: Yes, and this is a big benefit of the integration with ForeFlight. To debrief a flight flown with Stratus on board, create a track log in ForeFlight and import it to CloudAhoy.

We logged flights with Stratus and imported them into CloudAhoy for debrief. Good stuff.


Q: I’m already creating track logs with ForeFlight. Should I also log my flights with the CloudAhoy app?
A: If you’re using Stratus, then no. Otherwise it’s a matter of convenience – do you prefer to hit the START button on CloudAhoy before the flight, or to import the flight from ForeFlight afterwards? We have used both ways, and are still undecided which is more convenient (both are very simple).


How to import a flight from ForeFlight

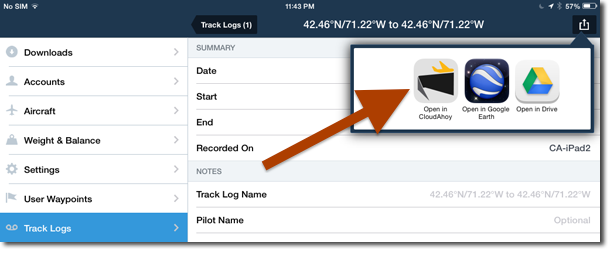
  • First you need to record a flight: tap REC in ForeFlight’s Maps tab.
  • In ForeFlight’s More tab, select the flight in Track Logs.
  • Tap the Share button on the upper-right, then tap Open In…
  • Select the CloudAhoy icon.

Note: when importing a flight from ForeFlight, CloudAhoy uses the track data from ForeFlight, and the pilot names, tail number and remarks from the CloudAhoy app. Before the import, you may want to verify that CloudAhoy has the correct pilot names, tail number and remarks. You can always edit this information after the flight was imported.

FF-CA12


Video, Embedded

video-overview

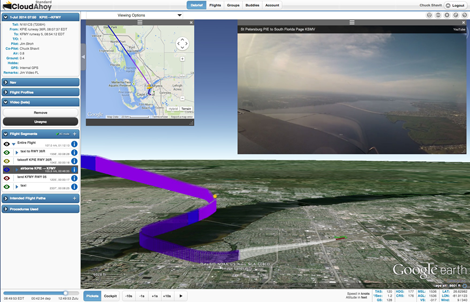
A growing number of pilots take videos of their flights. We received many requests to embed a flight’s video in the debrief – and we have developed this capability. This new feature is now in public beta. Thank you our pre-beta testers for your help!

Three steps to embed a video in CloudAhoy’s debrief:

Step 1: Upload the raw video to YouTube. It has to be raw, unedited.

Step 2: Add the video to your Flight

– Debrief the flight in CloudAhoy.

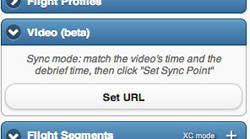
– Open the “Video (beta)” bar, click Set URL,
video-1

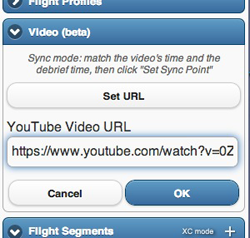
– Copy your video’s YouTube URL into the URL field and click OK.
vide-2


Step 3: Sync the video with CloudAhoy’s timeline.

– Move either CloudAhoy’s timeline or the video’s, such that both show the same event,

– Click Set Sync Point. Now the video and CloudAhoy are in sync. You would typically set Cockpit mode during the sync process, and set the times so that the video and the cockpit view will show a similar picture.


Notes about the synchronization process
The sync process has to be performed only once. CloudAhoy will remember it the next time you debrief the flight, as well as when the flight is shared with someone.

If you started logging the flight before takeoff, CloudAhoy’s debrief automatically sets the time at the beginning of the takeoff roll, and to sync it is usually easy to position the video on that spot as well.

Tip: if the sync point is off by a few seconds, click Unsync, then use CloudAhoy’s +1s or -1s buttons as needed, then click Set Sync Point again.

POV buttonsTip: play cockpit view so both CloudAhoy and the video show a similar picture, then use CloudAhoy’s Point of View buttons to look at different directions. You now have two view points of the same flight. Try for example to have cockpit view look at the aircraft’s 6 o’clock while the video shows the forward view.

This is a beta release of the video integration feature. Please let us know how it works for you – dev@CloudAhoy.com


CloudAhoy at AirVenture 2014

AirVenture logo
If you are coming to Oshkosh next week, this note is for you!

See you in booth 1094, hangar A
*
Presentation: Tues. July 29, 11:30 – 12:45, Forum 3

Personal tutorial: debrief YOUR flight

Nate CFIIWould you like to get a personal tutorial of debriefing your flight with CloudAhoy?

• Log your flight to KOSH with CloudAhoy, then come to our booth and debrief your flight with us.
 or
• Come to our booth, use our X-Plane to fly a 5 minute simulated approach into KOSH (VFR or IFR), and debrief your approach with us.

Nate (CFII/MEI) and Chuck will be in the booth to debrief with you.


1-Month Gift Subscription

CloudAhoy BubbleEvery visitor to our booth will receive a gift of one month subscription to CloudAhoy Standard.

  • Have a CloudAhoy Free account?
    You will get a CloudAhoy Standard for a month.
  • Already have a CloudAhoy Standard subscription?
    You will get an extra one month.
  • You are within the 35 days trial of CloudAhoy Standard?
    You will get an extra one month.
  • New to CloudAhoy?
    Get an extra one month on top of the 35-days free trial.

To receive this gift, check in with one of us at our CloudAhoy booth.


See you in booth 1094, hangar A

Presentation: Tues. July 29, 11:30 – 12:45