LogTen Pro Integration

We are delighted to announce that starting today you can export your CloudAhoy flights to LogTen Pro, one of the leading electronic logbook providers.

stepsLTP1The new feature transfers data from selected CloudAhoy flights to LogTen Pro, saving you manual data entry in LogTen Pro. With one tap on a button in CloudAhoy, LogTen Pro flight logs are automatically created with over 20 fields per flight – including the departure and destination airports, the exact times of rotation and touch-down, the taxi times, the flight crew, and the aircraft’s tail number and type.


Supported devices
This feature is available on both the iPad and the Mac. Of course, to use it you will need a LogTen Pro app installed on your device.
Note: this feature is not supported on Windows,


How do I export flights  to LogTen Pro?
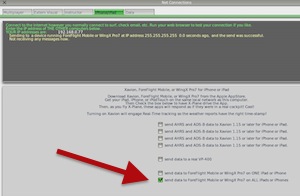
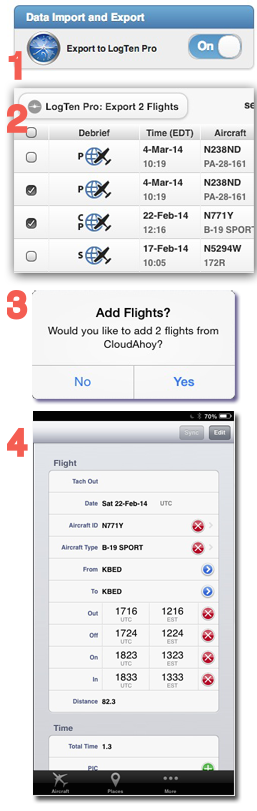
1. Enable LogTen Pro flights export: go to your CloudAhoy’s Account tab, and switch on “Export to LogTen Pro”. You only need to do this once.

2. Select the flights you want to to export using the checkboxes in the Flights tab. You can select all by checking the box in the header line. Once selected, click or tap the LogTen Pro button.
You can export any flights; it’s as easy to enter today’s flight as it is to enter a flight from last year.

3. LogTen Pro will ask you to confirm. Tap Yes.

4. Your flights are added to LogTen Pro.


What if I export the same flight twice?
Suppose for example that you select all the CloudAhoy flights and export them; some of the flights  have already been exported before. It’s safe to do so – no duplicated flights will be created in LogTen Pro. If you have edited a flight in CloudAhoy, for example changed the co-pilot’s name, export it again and the data will be updated in LogTen Pro.


NEW: CloudAhoy Free – flight track (“breadcrumbs”)

CloudAhoy FreeWe are happy to announce a ​​free version of CloudAhoy.

CloudAhoy Free is a subset of our full-featured debrief product.
The full-featured product, including the debrief and sharing capability, is now called CloudAhoy Standard. Check this for a feature list of the two products.

What’s in CloudAhoy Free?
Flights’ tracks (“breadcrumbs”) is the new free feature – in addition to flight logging, and secure web-based access. And just like CloudAhoy Standard, CloudAhoy Free automatically identifies airports and runways, computes the exact wheels-up/down times, and auto-segments the flight track with color coding.

Track-modeEvery CloudAhoy account becomes automatically a CloudAhoy Free account at the expiration of the free trial, unless of course you buy a subscription for CloudAhoy Standard.

So – if you have a CloudAhoy account and you are not a CloudAhoy subscriber, we invite you to use CloudAhoy Free, and hope that you find it a great way to log and view your flights’ tracks.

Upon upgrading to CloudAhoy Standard, you may debrief and share all your past flights including those logged with CloudAhoy Free.

Enjoy!

Click here to subscribe to our newsletter.

Click here to signup to CloudAhoy.

Speed and Altitude Units

We’ve had requests from users, especially pilots of vintage airplanes, to have the ability to change the speed and altitude units. This feature is now available.speed-altitude

You can choose the units to be:
Speeds: knots, mph or km/h.
Altitudes: feet or meters.

The units that you choose will be used in the Debrief tab’s timeline data, as well as in the sidebar profile graphs. The timeline also displays which units are currently in use.

To customize the speed and altitude units, do the following:

  1. Go to the Account tab.
  2. Find the “My Analysis Preferences” section.
  3. Change the Speed Units and Altitude Units fields by clicking the dropdowns that appear to the right and choosing the desired units.

Enjoy!

App 3.3: Debrief Your Simulator Flights

We have released version 3.3 of the CloudAhoy iOS app. With this version you can log your simulator flights just like you’ve been logging your real aircraft flights. No additional hardware is needed – the data is shared via WiFi.


X-Plane
Connecting to X-Plane over WiFi

You would need the following setup; if you are familiar with connecting X-Plane to ForeFlight or WingX Pro7, connecting CloudAhoy is identical. 

  1. In X-Plane, select Settings > Net Connections,
  2. Select the iPhone/iPad tab.
  3. Check the last checkbox (“send data to ForeFlight or WingX Pro7 on ALL iPads or iPhones”).
  4. Check the GPS field in the CloudAhoy app. It should display “Simulator”.

Logging a simulator flight is the same as logging a real flight: enter the pilot name (or names), the tail number, and optional remarks, then tap START.

->  IMPORTANT
While CloudAhoy logs a simulator flight, it must be in the foreground. If you switch to  another app, CloudAhoy’s logging will stop. When CloudAhoy logs a simulator flight, it prevents the screen from locking.


Connecting to Microsoft Flight Sim X over WiFi

  1. Follow Sporty’s iPad News article about connecting FSX to ForeFlight .
  2. Check the GPS field in the CloudAhoy app. It should display “Simulator”.
  3. As described above, CloudAhoy must run in the foreground.

The Debrief Timeline: Redesigned

newTimeline1The Debrief tab’s Timeline has been part of CloudAhoy for a long time; it lets you control the aircraft’s position, view the aircraft parameters at any time during the flight, and control animation.

Until now the Timeline was part of the left panel. Many users have asked to be able to view the Timeline when the left panel is closed. So – we moved it, as seen on the screenshot above; most of it is now permanently at  the bottom of the screen, and the 3D viewing controls are on the top-right.

The functionality is the same as before, and we thought we’d take the opportunity to list the things you can do with the Timeline. You can –

newTimeline bar

1 Drag the slider and move the aircraft’s location. As you do that, the flight time is displayed in three different formats: the local time, the time after departure, and the zulu time. If one or more flight profiles are displayed, the slider also moves a crosshair on the profiles.

2 On Windows and Mac computer in 3D display mode, select between Pickets and Cockpit view mode.

3 Select between

“Pause” mode –  the aircraft’s location can be moved manually, using the slider, or using fine control with the -10s, -1s, +1s and +10s buttons.

 “Play” mode –  the aircraft moves at selectable speeds, from 1x to 10x.

4 See the aircraft’s parameters’ display update as the aircraft’s location changes.
.

In 3D mode, you have round buttons at the top of the screen for easy control of the point-of-view:

  • look1In “Pause” mode, you can select side or top view, and can rotate 90° right or left. The buttons control the viewing of the currently selected segment. For example, if you selected the takeoff segment, the buttons will show it to you from different angles.
    .
  • look2In cockpit mode, you can select your viewing angle. You can look  forward (“12 o’clock”), or look to the side at any desirable angle. For example, we think it’s fun to look at your 6 o’clock as you takeoff – give it a try! You can also look at any angle up or down. The “H” button resets your looking straight at the current aircraft’s heading and attitude. The “C” button looks into the aircraft’s course rather than heading.
    .

As always, your opinion is very important. Let us know what you think of this change!


CloudAhoy 3.2 in the App Store

CloudAhoy version 3.2 is now released, fixing bugs related to UI and display:

  – iPad Mini: fixed the problem of incorrectly reporting “no internal GPS”.

  – CFI tab: fixed a display issue in the maneuvers table.

  – Other small UI changes.

 
Your app’s version is displayed at the bottom of the Settings tab.